Try Default

See how revenue teams automate revenue operations with Default.

Key Takeaways
If you want to accelerate your speed-to-lead, there are several RevOps capabilities you absolutely need. These include direct form-to-calendar integration, customized lead routing, automated follow-up to no-shows and cancellations, and more.
Unfortunately, HubSpot Scheduling offers none of these.
But while HubSpot’s capabilities are limited at best, there are some tricks that will help you get the most out of the tool. In this article, we’ll take a look at how to get the most out of HubSpot scheduling and offer our recommendations for some RevOps tools that will overcome its drawbacks.
Ready to overcome the limitations of HubSpot and accelerate speed-to-lead? Learn more about the leading RevOps Automation Platform on the market.
What is HubSpot Scheduling and how does it work?
HubSpot Meeting Scheduler is the platform’s native sales scheduling software. It does exactly what the name suggests: once you integrate your Google or Microsoft calendar with HubSpot, you can send a custom meeting link to prospects. They can then schedule a meeting directly based on your availability.
Once the meeting is scheduled, the prospect’s information is either added to HubSpot CRM as a new record or, if a contact record already exists, their information is updated with the information captured in the scheduling form.
Although technically available for all pricing tiers, the HubSpot Scheduler with the Starter Hub is very limited—most notably, you can’t remove the HubSpot brand from your page. What’s more, it’s not until you get to the Professional and Enterprise Hubs that you start to get automated scheduling, custom meetings, and more.
How to set up HubSpot meeting scheduling: Step-by-step guide
Real-time scheduling is critical to accelerating your inbound sales. Thankfully, setting up a HubSpot meeting is easy and straightforward. Just follow these steps.
1. Connect your calendar
Before you can set up the HubSpot meeting scheduler, you’ll need to connect your calendar. HubSpot supports both Google and Microsoft (i.e. Outlook or Exchange) calendars.
- On the left-hand menu, select Library > Meetings Scheduler.
- If this is your first time visiting the meetings page, select Get started.
- You’ll navigate to the Meetings Scheduler tool. If you haven’t connected your calendar before, a pop-up box will appear like the one below:

- Select Connect calendar.
- Choose whether you’re connecting a Gmail, Outlook, or Exchange calendar.
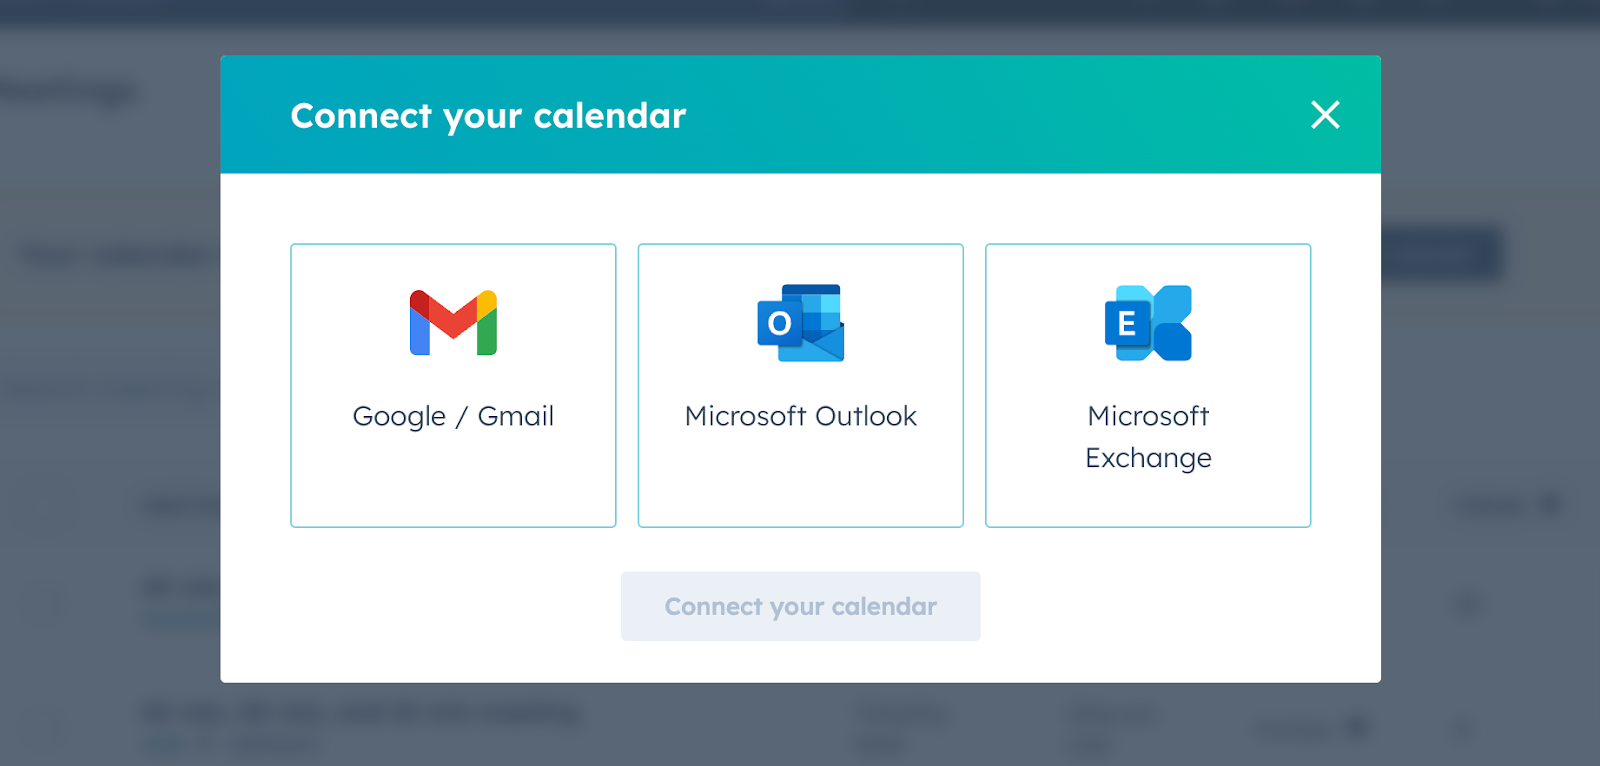
- You’ll need to grant HubSpot access to your account. A message like the following will appear. Select Accept and connect to [Calendar Provider] and follow the prompts that appear.
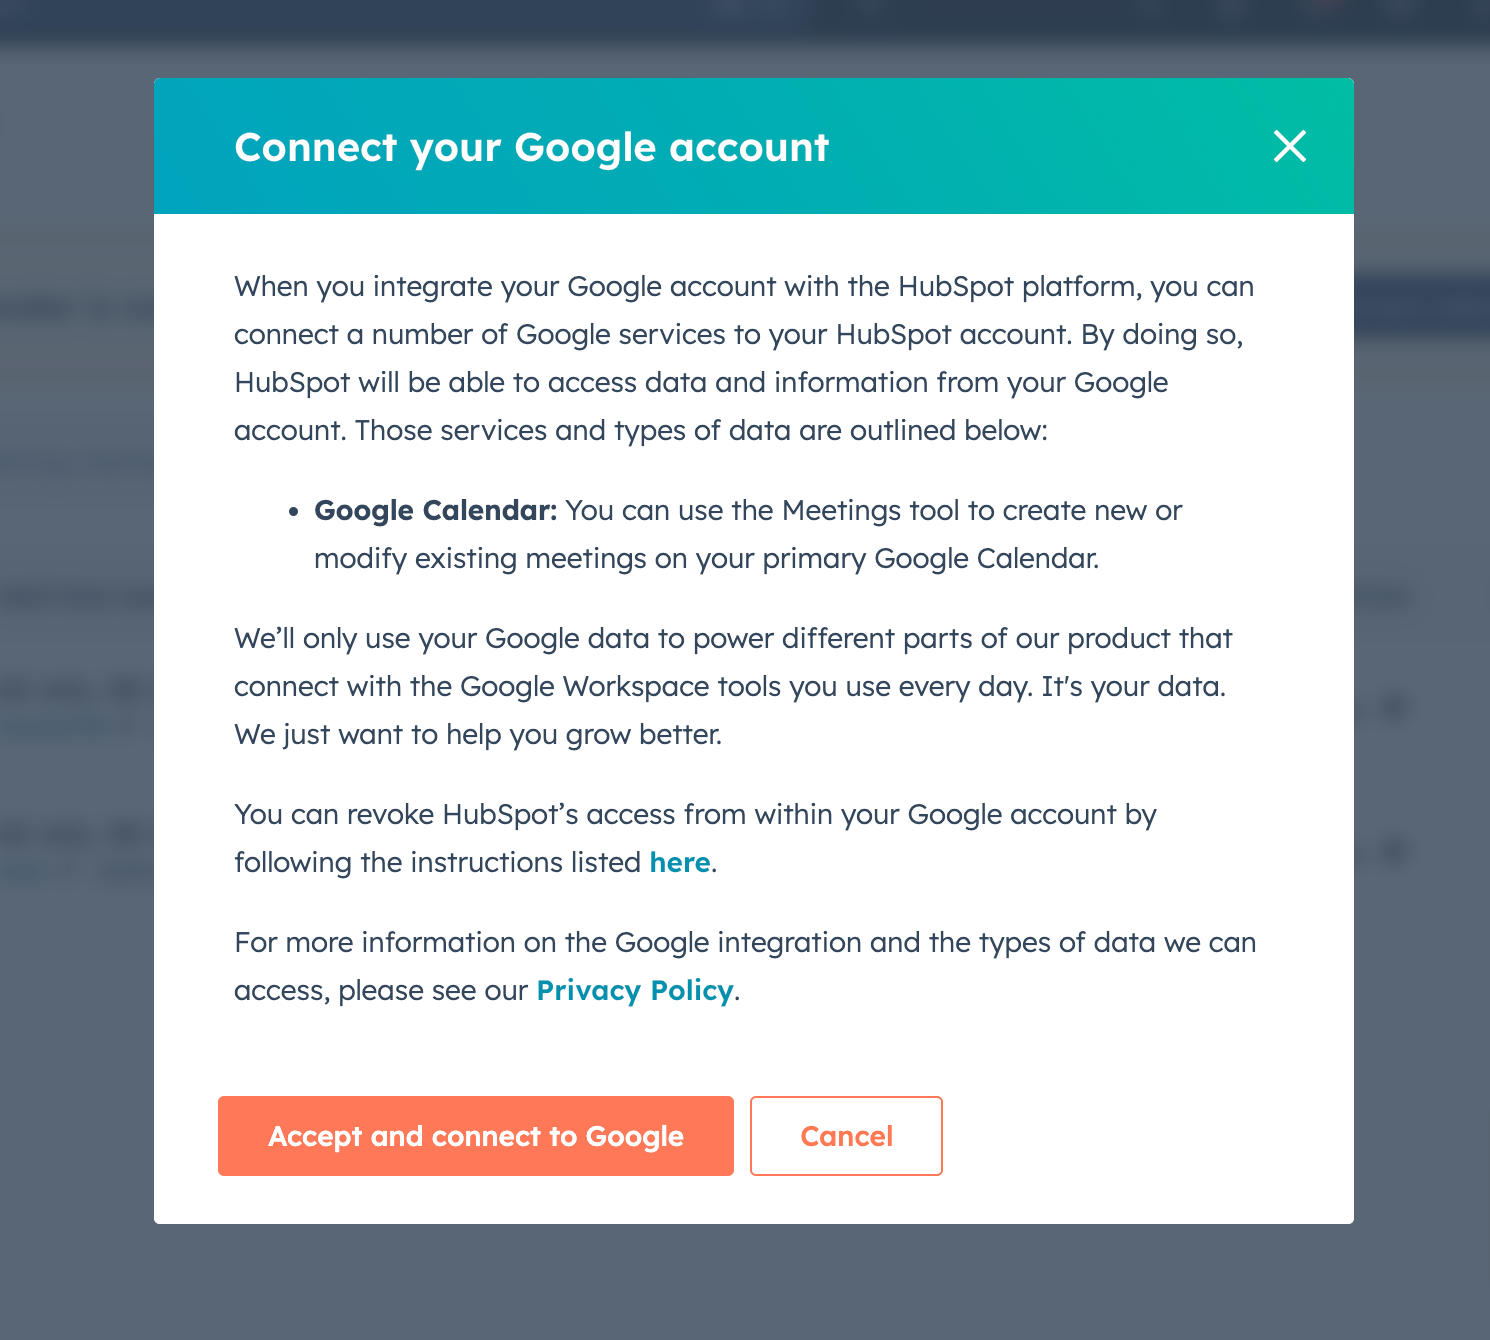
💡Pro tip: Each user will need to connect their own calendar to your HubSpot account—this isn’t something you can do on the admin level. Feel free to copy the instructions in this section and distribute them to your sales team.
2. Choose your meeting type
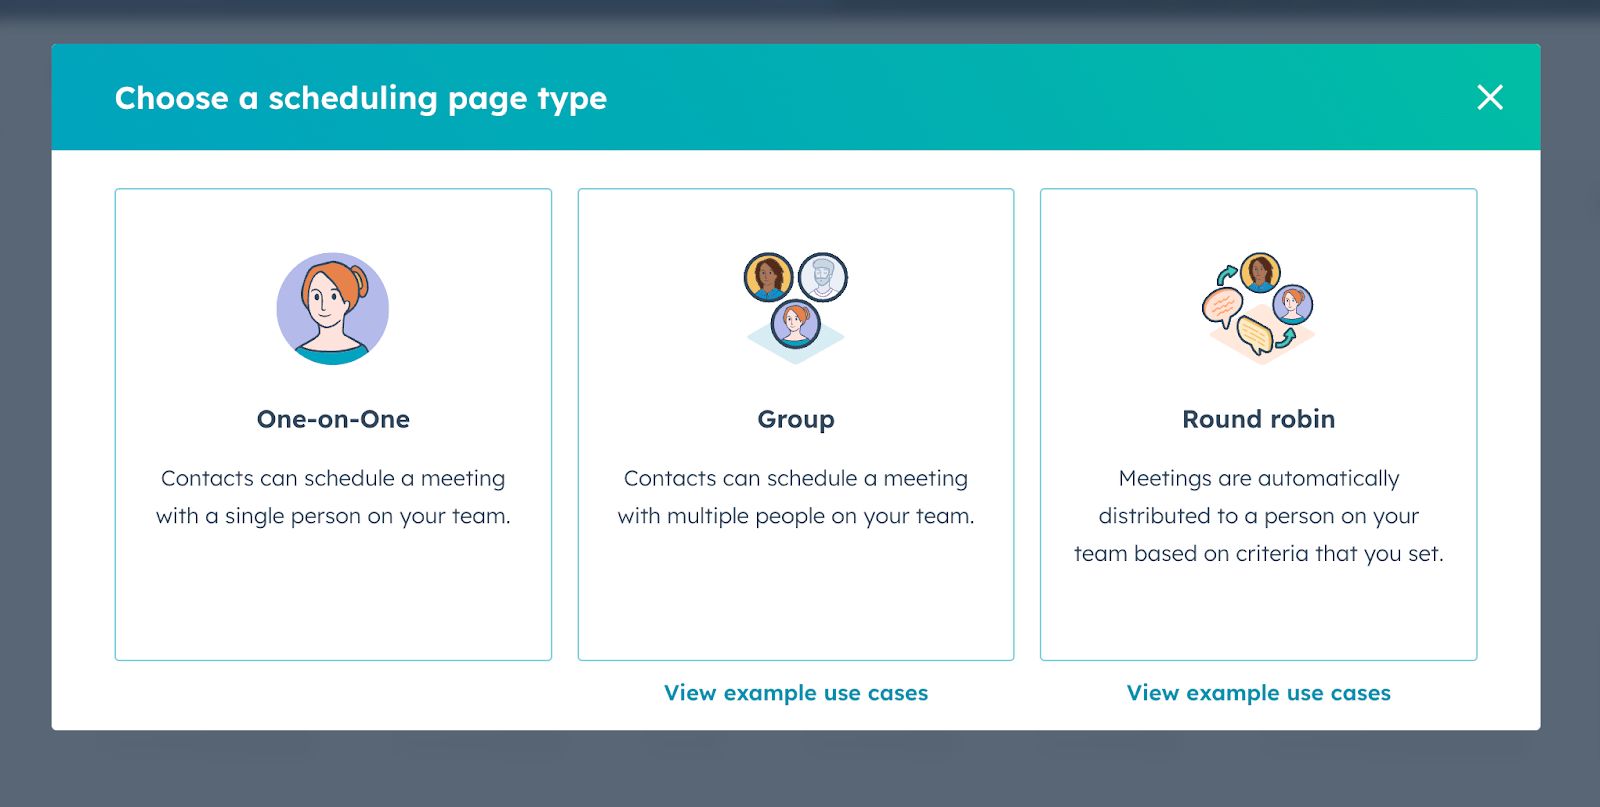
The next step will be to create a dedicated page so users can directly book meetings on your calendar. HubSpot allows you to create three types of meetings:
- One-on-one meetings—these are pretty straightforward, where the prospect directly grabs a slot on your calendar
- Group meetings—prospects can grab a time when all of the connected calendars are available
- Round robin meetings—prospects can grab a time when at least one of the connected calendars is available
3. Edit your scheduling page’s basic information
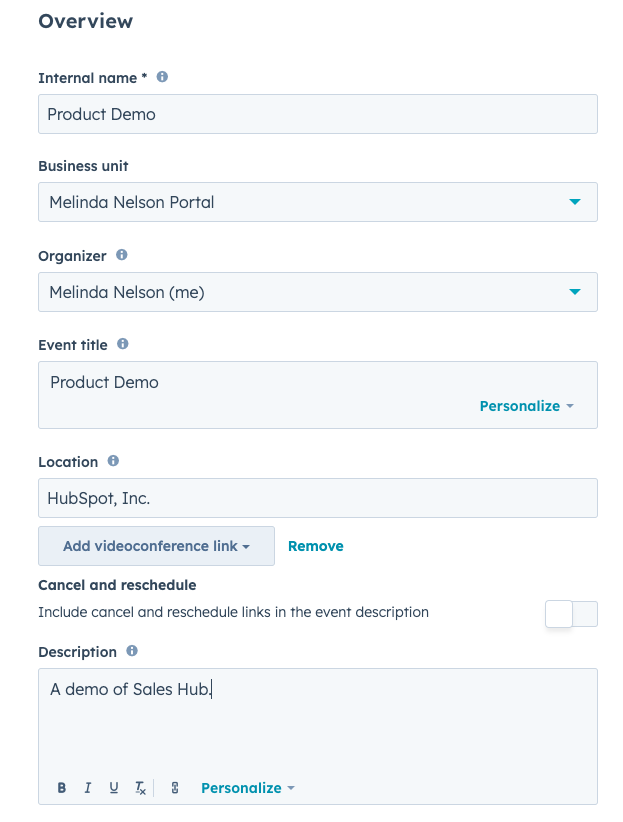
The first place you’ll be directed to is the Overview page, where you’ll be prompted to update the page’s basic information:
- Internal name. This is what HubSpot users will see when they go to access, edit, or use the page.
- Business unit (add-on only). If you have the business unit add-on, you can select which business unit to associate with this meeting.
- Organizer. This is either the meeting owner (group or round robin) or the user the prospect schedules a meeting with (one-on-one). In order to include other users in your meetings, they’ll need to go in and activate the meetings tool. If you want their availability to show up, they’ll need to also activate their calendar.
- Event title. This is the external name users will see when they visit the scheduling page. You can use personalization tokens in the event title (e.g. “Discovery Call with <<first_name>>).
- Location. This can either be a call link (e.g. Zoom) or a physical location.
- Add videoconference link. If you are doing a virtual meeting, this is where you should insert the join link. To use this integration, you need to integrate your own video conference software with HubSpot.
- Cancel and reschedule. This toggle switch, when activated, enables the prospect to revisit this page and cancel or reschedule any events currently on the calendar.
- Description. Add any relevant information about the meeting. You can use personalization tokens in this field as well.
Once you’ve added this information, select Next.
4. Include team members
If you have the Sales or Service Hub Starter, Professional, or Enterprise, you can go in and select which team members you want to include in the meeting.
Note that for this feature to work, the team member in question must activate their meetings tool. Technically, the user doesn’t need their calendar to be connected. But without a calendar integration, their availability won’t show up on the page.
If you’re creating a group meeting page, a user cannot remove themselves as a team member once the page is created. If you’re creating a round-robin meeting page, however, they can.
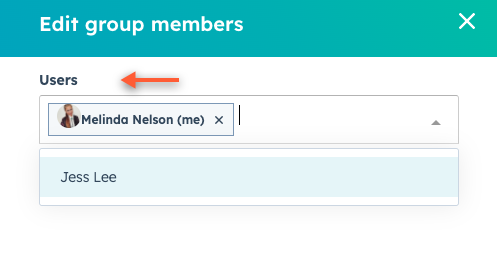
Once you’ve added all relevant team members, select Next.
5. Configure scheduling settings
You’ll then be directed to the Scheduling page, where you’ll have the option to customize your availability and booking form. After updating the page’s URL and deciding whether or not to accept payments through this page (we won’t go into that here), navigate through the five following tabs to update the page.
Welcome (round-robin meetings only)
If you’re creating a round-robin meeting, you can choose to display the contact owner’s scheduling page (if the prospect already has an owner in HubSpot). Otherwise, the contact will go directly to the round-robin scheduling page.
When this setting is enabled, you can customize the following settings:
- Page title. This is the text that appears on the welcome screen, asking for the prospect’s email address (this is necessary to match the prospect with their owner in HubSpot).
- Description. This is an opportunity to add additional text, explaining to the prospect why you need their email address.
- Image. Choose between a default meetings icon, company avatar, or a custom image.
Schedule
The Schedule tab enables you to customize any of the following elements of the scheduling page:
- Title (e.g. “Meeting with [Rep Name]”)
- Duration. You can set one or more meeting duration options (e.g. 15, 30, and 60 minutes).
- Time zone. Select which time zone your availability will be based on.
- Availability window. Set which hours you want to be available for (e.g. 8:00 am to 6:00 pm). Otherwise, you’ll be set as available 24/7!
Select Additional options to customize all of the following features:
- Image. Choose whether the organizer’s avatar, company avatar, or a custom image is selected for your calendar.
- When a meeting can be scheduled. Set how far in advance people can book meetings on your calendar. This can be either a rolling period or specified date range.
- Minimum notice time. Determine how far in advance of a meeting time the prospect can book a meeting.
- Buffer time. Set a designated amount of time between meetings.
- Start time increment. Decide how frequently you want there to be a start time option. For example, a start time increment of 15 minutes will give prospects the option to book a meeting at 9:00, 9:15, 9:30, 9:45, and so forth.
- Booking page language
- Date and time format
Form
After selecting a time on your calendar, prospects will be directed to the Form page, where they’ll submit the information you require to book a meeting. You can customize which fields appear on that page on the Form tab.
HubSpot’s default setting is for users to submit their First Name, Last Name, and Email when booking a meeting. Sales and Service Hub users can add additional fields to the form—both existing contact properties and custom questions.
You can customize the Forms tab by making fields required or optional, adding a CAPTCHA challenge to reduce spam, blocking free or specific email domains, and even allow prospects to invite other guests to the meeting.
Note: If a user uses a unique email address to submit a meeting form, HubSpot will automatically create a new contact for that user.
Confirmation
Once a prospect schedules a meeting on your HubSpot calendar, you have a number of options for what happens next. From the Confirmation tab, you can:
- Redirect to another page. Send the prospect from HubSpot to your website, a Loom video, or other link. Simply select Add external link and enter a URL into the dialog box.
💡Pro tip: If you’re going to redirect to another page, make sure install a tracking pixel on the page to track click-through rates.
- Send to a HubSpot page. Simply select one of your existing HubSpot pages from the dropdown menu.
Automation
Finally, the Automation tab enables you to customize which communications the prospect will receive after they book a meeting:
- Confirmation emails. HubSpot will send this email immediately upon booking the meeting. Note that while you can turn the confirmation email on or off, you can’t change its content. To send a customized confirmation email, you’ll need to create an automated email and set up a Workflow to deploy it.
- Pre-meeting reminder email(s). You can, however, customize the pre-meeting reminder emails sent and specify how many weeks, days, hours, or minutes before the meeting that email should be sent out. You can add up to three reminder emails directly from the Meeting Scheduler. To send more, you’ll need to create a Workflow.
When you send confirmation and reminder emails, these are logged in HubSpot as transactional emails and, thus, do not count toward your email send counts. If you end up using Workflows to schedule your follow-up communications, however, they will.
💡Pro tip: If you’re using HubSpot Workflows to automate lead follow-up, it’s a good idea to turn off these automations and simply integrate all your follow-up communications into your Workflows.
6. Deploy your scheduling page(s)
Once you’ve created scheduling pages for yourself and your team, the next step is to deploy them. Here are some common use cases:
- Insert links into your email signatures
- Add to HubSpot email Templates for inclusion in sales Sequences
- Create automated emails with scheduling links for mid- and bottom-of-funnel Hubspot lead nurturing sequences
- Embed in landing pages
Benefits of using HubSpot Meeting Scheduler to book meetings
On its face, the HubSpot Meeting Scheduler isn’t anything special. Other sales scheduling software has more advanced features and, in many cases, is easier to use. (To see an example, read our HubSpot vs. Calendly comparison guide here.)
Still, the scheduler is popular among many revenue teams. Here are some of the biggest pros to using this tool.
Native integration with CRM and Marketing, Sales, and Service Hubs
Without a doubt, the #1 reason to use the HubSpot Meeting schedule is its native integration with the platform’s other inbound functionality. Although technically you can integrate another solution like Calendly, HubSpot functions more seamlessly when you use their built-in scheduler.
Some of these features include:
- Automated lead qualification and lead scoring
- Real-time lead-to-account matching
- Round robin routing to available sales reps
- Post-meeting follow-up via Workflows or Sequences
- Ongoing lead tracking via HubSpot analytics and dashboards
That said, we don’t want to paint too rosy a picture here, there are some significant drawbacks to this tool that we’ll get into below. But generally speaking, you’re going to run into fewer problems using an all-in-one platform (like HubSpot or Default) vs. trying to build a Frankenstack of point solutions.
Ease of use
Across all its tools and features, HubSpot is well known for their ease of use—and their meeting scheduler is no exception. Not only is it straightforward to customize on the back end, but the front end is also easy for most users to follow.
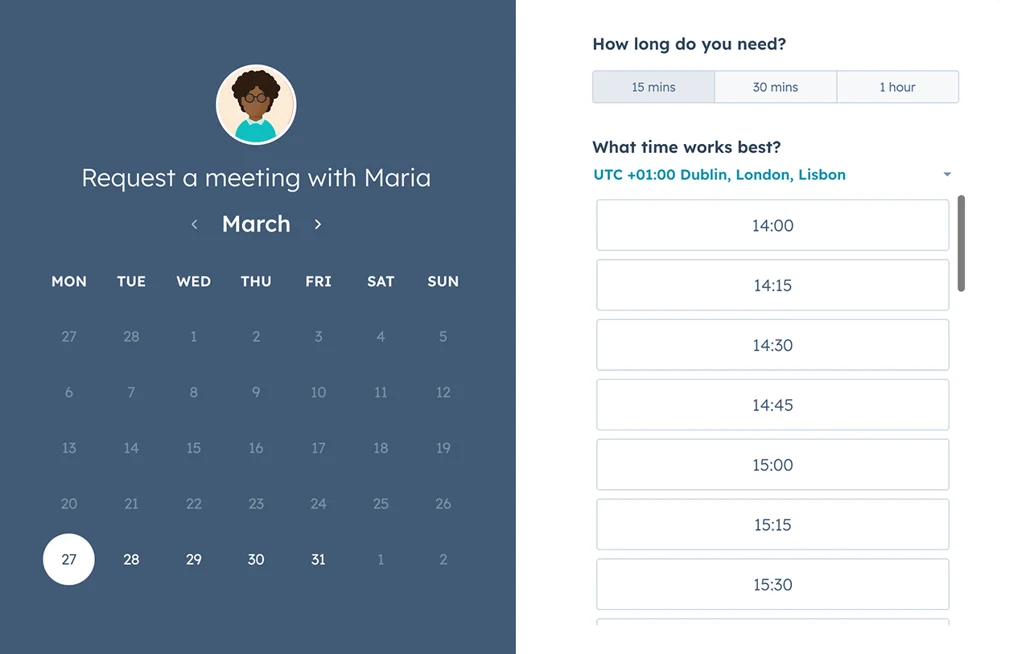
However, it’s worth noting that many of these customization features are only available with the Professional or Enterprise tiers. So you’ll want to keep an eye on how much you’re spending. It may not be the most cost effective way to get all the functionality you want.
Scalable pricing model
HubSpot’s pricing model is built with the fast-growing startup in mind. You can start with a free meeting scheduler (but without the ability to remove the HubSpot branding) and increase your spend as you bring in revenue.
However, often missed in the fine print is that most of the automation and customization features mentioned above only come with the higher pricing tiers.
Sophisticated analytics
HubSpot’s analytics engine is often heralded as a must-have for RevOps teams. This is because they’ve struck a good balance between depth and sophistication of insights, as well as usability for non-data analysts.
While the sky’s the limit on the types of reports and dashboards you can build in HubSpot, here are some examples of meeting-related dashboards HubSpot offers:
- Sales activities dashboard—track all completed activities including calls, emails, and meetings
- Meetings booked dashboard—track the total number of meetings booked daily via HubSpot links
- Meeting source analytics—track where your meetings are coming from (e.g. outbound, direct traffic, organic search, social media)
- Sales rep performance dashboard—see which reps are booking the most meetings, have the highest conversion rates, have the least number of cancellations, etc.
- Meeting scheduler analytics—see which scheduling pages have the most views, bookings, and conversion rates
Drawbacks of the HubSpot scheduling tool
As a sales scheduling tool, the HubSpot meeting scheduler can handle simple, straightforward use cases fairly well. But when you start to consider more complex B2B use cases or non-linear buying journeys, HubSpot’s meeting scheduler has some challenges.
Limited follow-up workflows
With HubSpot, you can send confirmation emails and meeting reminders, but that’s about it. There’s no way to tailor your follow-up workflows to the prospect’s engagement and activity:
- Sending an email when a prospect reschedules the meeting to promote a sense of urgency
- Enrolling prospects in a follow-up sequence when they cancel a meeting
- Ongoing engagement with prospects that book a meeting but are a no-show
Limited lead routing
When it comes to lead routing, HubSpot’s capabilities are as limited as its follow-up workflows. For HubSpot, lead routing is limited to contact assignment, and even then you have only two options: round robin or rules based.
You have none of the advanced capabilities that modern B2B sales organizations need:
- No custom or flexible round robin rules (i.e. integrating rules-based and round robin models)
- No routing based on enrichment data
- No way to directly integrate a HubSpot meeting link with your forms AND route them to a prospect—you have to choose one or the other
Additional lead enrichment costs
As we mentioned above, lead enrichment with HubSpot is costly. Breeze Intelligence operates on a credit-based system, and the only way to automate lead enrichment is an all-or-nothing solution—every new contact created gets enriched.
Additionally, lead enrichment doesn’t always happen at the point of conversion. This means if you want to route based on enrichment data, you need to delay your routing workflow. Obviously, this reduces your chances of booking a meeting with the lead, making it essentially a non-solution.
High cost
To create a smart, automated sales workflow requires more features than simply a calendar booking tool. You need to be able to map your automations to complex buying journeys, handle complex lead-to-account matching scenarios, deal with real-time enrichment and routing, and more.
While HubSpot offers some of these capabilities, their most advanced features only come with the Professional and Enterprise plans, which are cost prohibitive for most early-stage companies. And even then, you’ll still have problems with rigidity, advanced routing, enrichment, and more.
How to automate sales meetings effectively and effortlessly with Default
Thankfully, there’s a more cost effective option with more advanced sales workflow capabilities on a unified, seamless RevOps platform. If you need a tool that can handle complex, customized lead routing capabilities, Default is the best option. Here are some key reasons why.
Direct form-to-calendar integration
With Default, all of our lead capture forms integrate natively with our calendaring feature. When a lead submits a form, they automatically book a meeting—significantly closing the gap between conversion and meeting.
Advanced lead routing
Default’s lead distribution functionality is light years beyond what HubSpot has to offer. We offer complete customization of your routing rules—e.g. integrating round robin and rules-based models. What’s more, we do more than change an “owner” field in your CRM:
- Enrich leads in real-time to allow for smarter and more accurate lead qualification and routing
- Automatically book meetings on the routed rep’s calendar at the moment of conversion
- Instantly send a notification to the rep via email and Slack
- Handle multiple account owners, business units, and other complications that arise with B2B sales
Built-in lead enrichment
As we mentioned above, Default automatically enriches leads at the point of conversion. Default also includes waterfall enrichment, AI-powered insights, intent data, and more. This enables a range of advantages that HubSpot doesn’t offer:
- Shorter (and, thus, higher converting) conversion forms, as we’ll fill in most of the relevant data on the back end
- Faster and more accurate lead qualification
- Highly customizable routing and follow-up based on AI-generated workflows
Fully customizable workflows
Default’s advanced automation capabilities go well beyond lead routing. You can use our platform to build a range of inbound marketing workflows, including:
- Custom follow-up based on whether the prospect rescheduled, cancels, or doesn’t show up to a meeting
- Detailed segmentation based on hundreds of data points created via enrichment
- Orchestration of other software in your tech stack
Better notifications
With HubSpot, booking notifications are sent via a form email to the contact owner’s email. While you can technically build out a Workflow that deploys custom emails to your owners, this counts against your email send count.
Default makes it easier to build multi-channel notification systems—including via email and Slack—so reps never miss a conversion and can respond as quickly as possible.
Full RevOps orchestration
No matter which tool you use as your RevOps platform, there will inevitably be some features that you just can’t get without bringing in other tools. For these tools to sync up perfectly, share data seamlessly, and automate your inbound processes with speed, you need an orchestration solution.
Default integrates with the vast majority of leading RevOps, marketing, and sales platforms. With our tool, you can build custom workflows for internal actions, data sharing, external communications, and more.
See how the right RevOps automation platform can bridge feature gaps and streamline all your cross-platform workflows.
HubSpot scheduling FAQs
What are the key features of HubSpot scheduling?
HubSpot scheduling has a handful of key features: automated meeting bookings on synced calendars, group and round robin meetings, data capture via forms, and automated followup.
Does HubSpot’s scheduling tool work like Calendly?
Yes, there are some similarities between HubSpot’s HubSpot’s scheduling tool and Calendly. However, HubSpot offers a more stripped down version of meeting scheduling than Calendly, with fewer options to customize its functionality and user experience.
Does HubSpot have a calendar tool?
Yes, HubSpot has a calendar tool called Meeting Scheduling. It integrates seamlessly with other platform features both through native functionality and custom workflows. However, the calendar tool does have some drawbacks, namely its limited features, rigid UI, and trouble handling complex automations and use cases.
Final thoughts on HubSpot scheduling
HubSpot Meeting Scheduling is a solid tool to accelerate speed-to-lead and improve inbound conversion rates. Its seamless integration with other HubSpot features is a high mark in its favor. However, its rigidity and limited functionality often prompts users to look for alternatives.
If you’re interested in a RevOps platform that combines high usability with an all-in-one suite of powerful features—capture, enrichment, qualification, routing, scheduling, orchestration, and more—Default should be your #1 pick.
Schedule a demo to learn more.
Learn more about the full capabilities of Default as a unified RevOps Automation Platform.
Conclusion

Run revenue as an engineered system
Revamp inbound with easier routing, actionable intent, and faster scheduling




.png)


