Try Default

See how revenue teams automate revenue operations with Default.

Key Takeaways
Automations are 10X easier to build when done visually. They’re cleaner, easier to inspect for errors, and clarify what could otherwise be a complicated series of triggers and events. Thankfully building visual workflows in Salesforce is easy, all thanks to Salesforce Flow.
With Flow, you don’t have to wrangle the complex logic of Lead Assignment Rules (LARs), manage notoriously difficult Visualforce pages, or build complex custom solutions in Apex. Instead, you can use a simple point-and-click approach to build automations for any RevOps process.
Read on for our comprehensive how-to guide to using Flow so you can start leveraging Salesforce’s full automation capabilities.
What is a visual workflow in Salesforce?
Salesforce Flow enables you to visually design and automate marketing and sales processes through a user-friendly drag-and-drop interface. This enables you to create sequences of triggers, actions, delays, and other elements that will automatically trigger based on specific criteria.
Examples of actions you can take in Salesforce Flow include:
- Creating, updating, and deleting records
- Sending emails
- Creating tasks
- Sending internal notifications
- Launching Apex actions
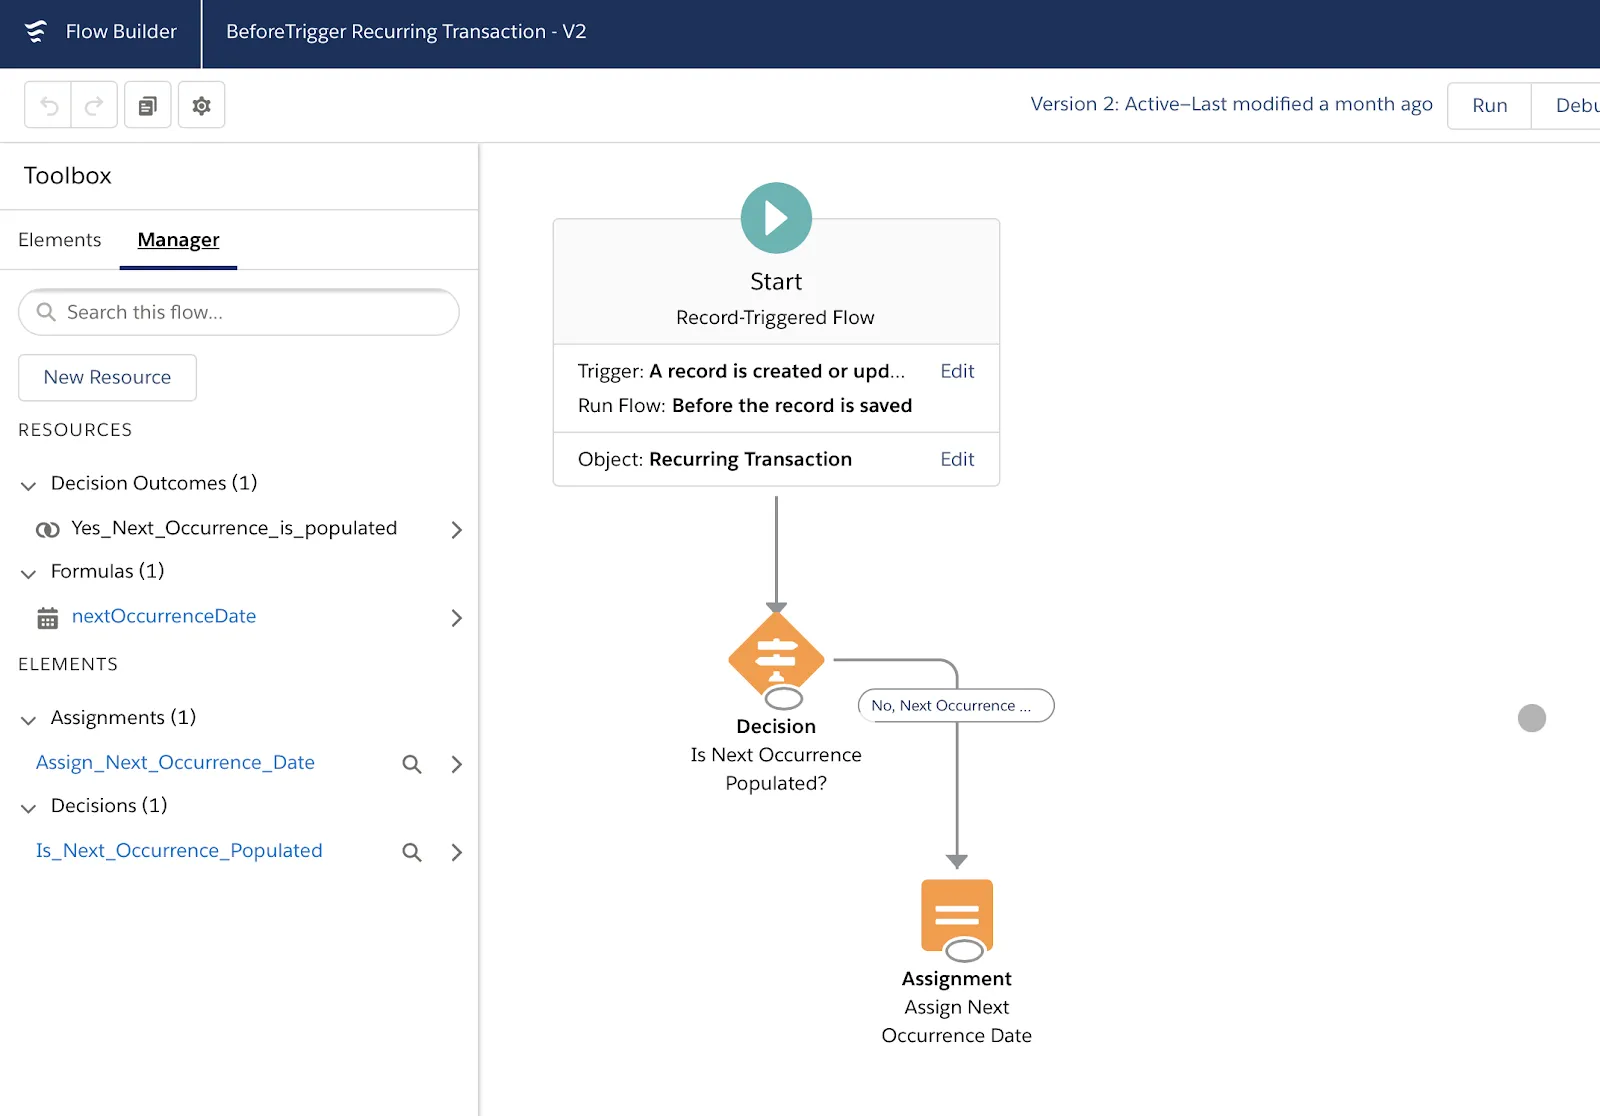
Salesforce offers a number of Flow types that you can use to build a wide range of sales workflows:
- Screen flows. Specific user interactions (e.g. using components, entering values) with a visual interface (called a “screen”) that can then trigger changes to Salesforce records. An example would be to use a screen flow to ask a lead several qualifying questions, then marking them as an MQL or SQL based on their response.
- Record-triggered flows. These flows are executed when a record is created, updated, or deleted, and can be triggered either before the record is saved (Fast Field Updates) or after it’s saved (Actions and Related Records).
- Schedule-triggered flows. These flows are executed at specific times and then either once, daily, or weekly.
- Autolaunched flows. You can automatically launch these flows through Apex, the process builder, APIs, or another flow. No specific triggers or user interactions are required to execute these.
- Platform event-triggered flows. These flows execute when a designated event occurs in Salesforce.
Modern B2B customer journeys are non-linear and complex. Mapping those journeys out without a visual aid is challenging, time-consuming, and can result in contradictions, gaps, and errors. Using a visual workflow tool in Salesforce can help you avoid those problems and lead to greater success as you scale up your inbound operation, especially when paired with some of the top inbound marketing solutions that integrate seamlessly into your tech stack.
How to build a visual workflow in Salesforce
So how do you go about building a workflow in Salesforce? As with most of the platform’s capabilities, it’s relatively easy to do once you get the gist of the overall platform.
What’s more, while building a Flow is a great first step, it’s only one of a number of steps in the process. These include testing, activating, distributing, and updating the Flow over time.
1. Build your Flow
Salesforce offers two approaches to building Flows: manually or with Einstein AI. Building a workflow manually is straightforward if you use Lightning Experience:
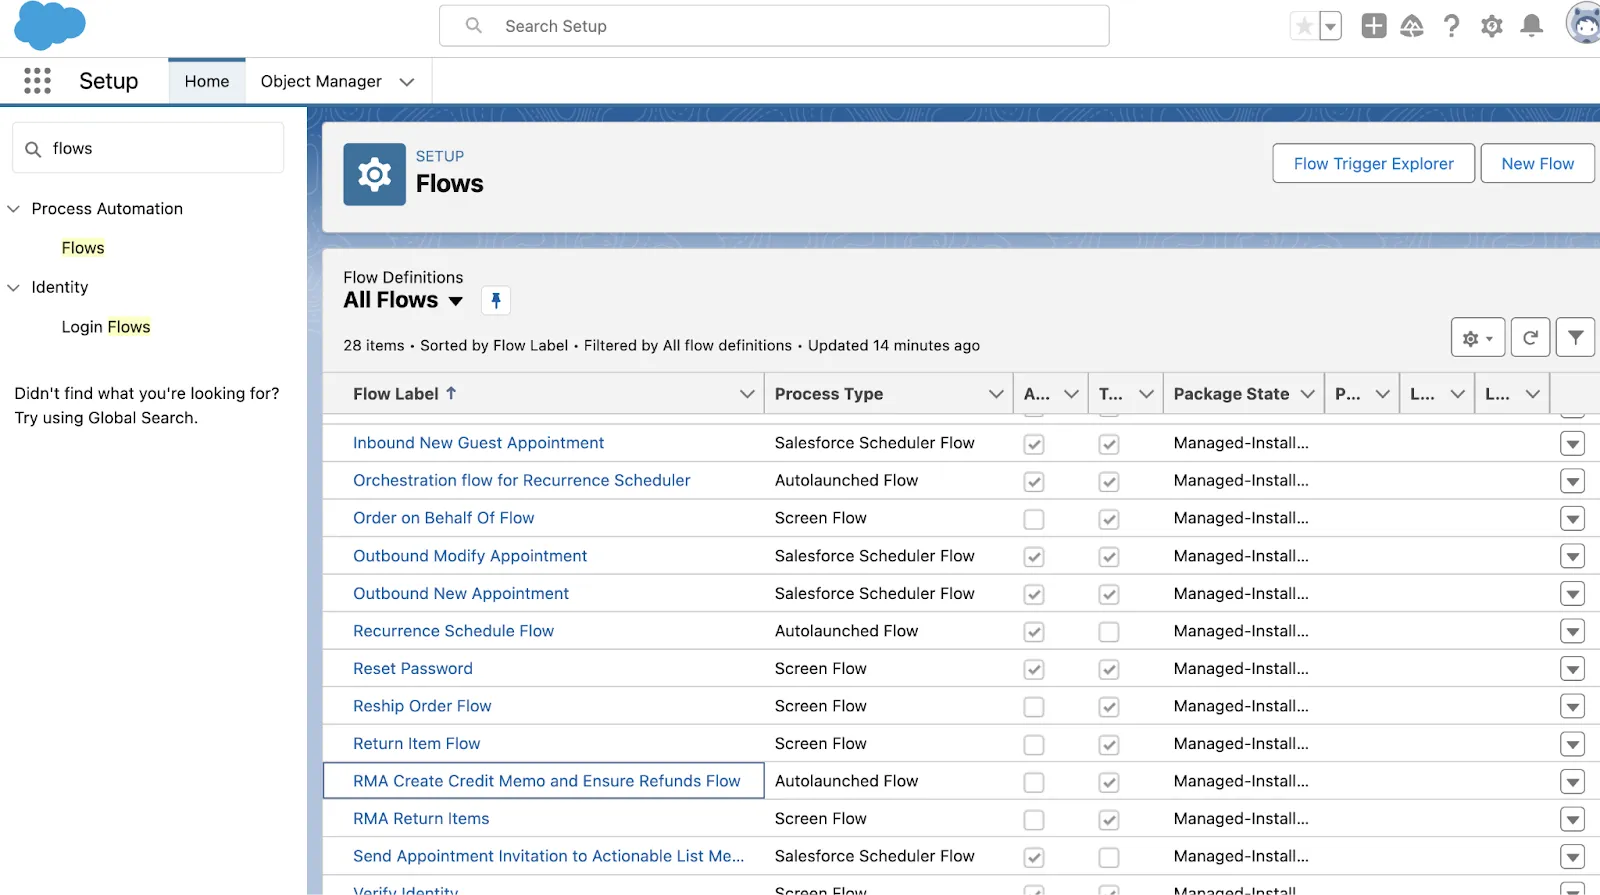
- Open Flow Builder. Navigate to Setup, then “Flows” into the Quick Find box (top left-hand corner. Select Flows.
- Select New Flow.
- Then select Start From Scratch, then Next.
- Select your flow type (from the list above), then select Create.
- Using the Toolbox side menu, add elements you want to the canvas. If you’re building a Flow in free-form, you’ll need to connect the elements to determine their order of execution. Building in auto-layout will automatically create those connectors for you.
- Once you’re done building your Flow, select Save.
To build a Flow using Einstein AI, you first need to turn on Einstein in Setup. In the Quick Find search bar, enter “Einstein.” You’ll then see an option to turn on Einstein AI if it’s included in your organization’s Salesforce Edition. If it’s not, you’ll have the option to request a demo.
💡Note: All Einstein products come standard with Marketing Cloud - Growth - Enterprise or Unlimited Editions. They are available as an add-on with Enterprise, Performance, and Unlimited Editions.
Then navigate to Einstein for Flow, then activate it. Once you’ve followed this step, follow this process:
- From the Flows section in Setup (see above), select New Flow. Alternatively, if you’re using the Automation Lightning app, select New.
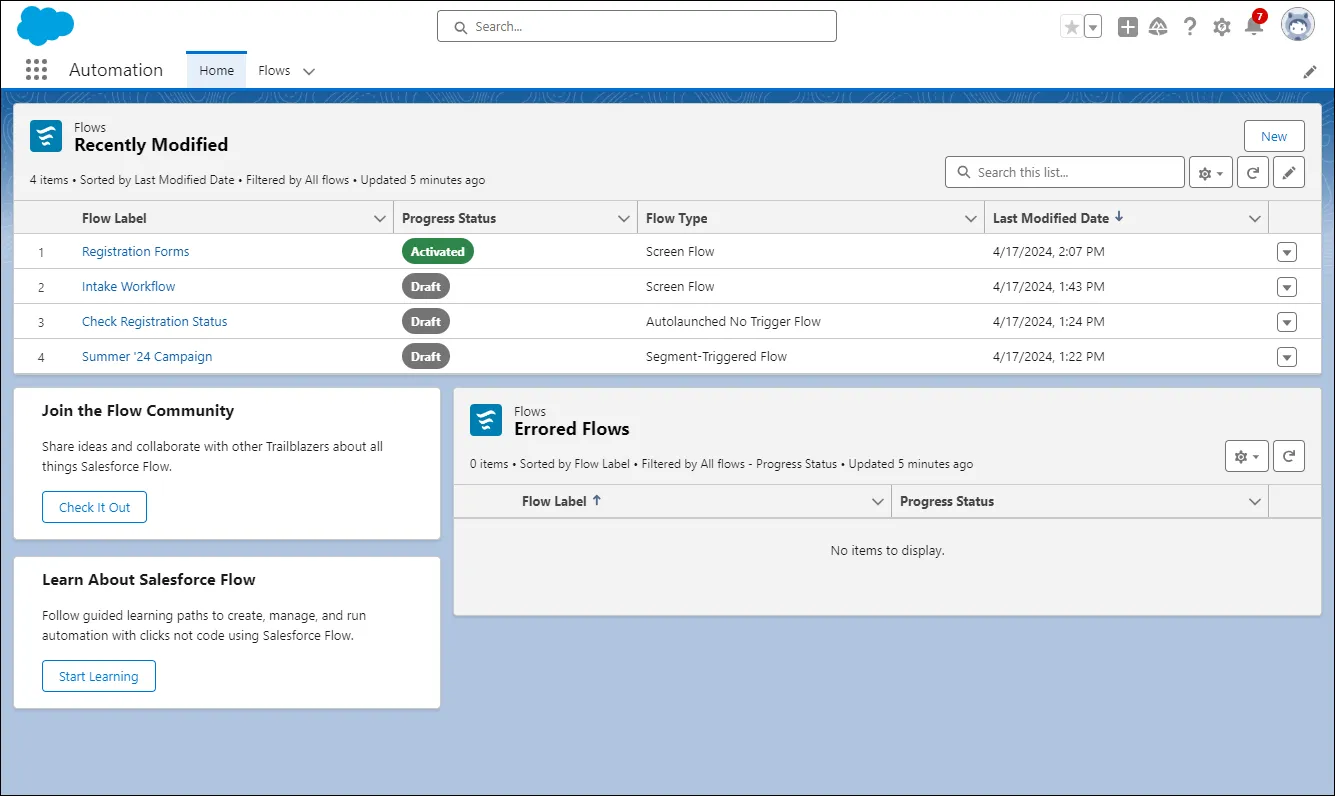
- On the next screen, select Let Einstein Help You BuildNext.
- You can then instruct Einstein to build your Flow. There are two ways to do this. some text
- Start from scratch. Simply describe your intended automation in the Instructions field.
- Start with sample instructions. Alternatively, you can select Get Started with Sample Instructions and select a sample that best suits your use case. Salesforce will automatically insert these samples into the Instructions field, where you can modify them as little or as much as you need.
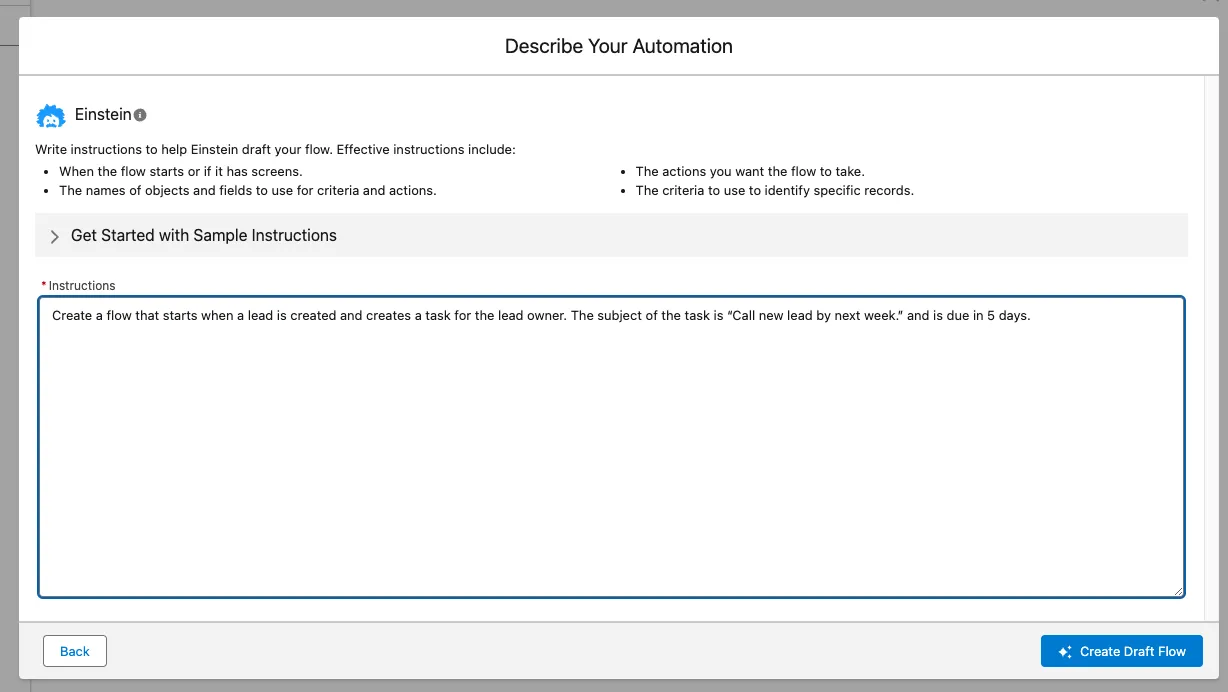
- Once you’ve entered your instructions, select Create Draft Flow. You’ll be direct to the Flow Builder, which will look like the following:
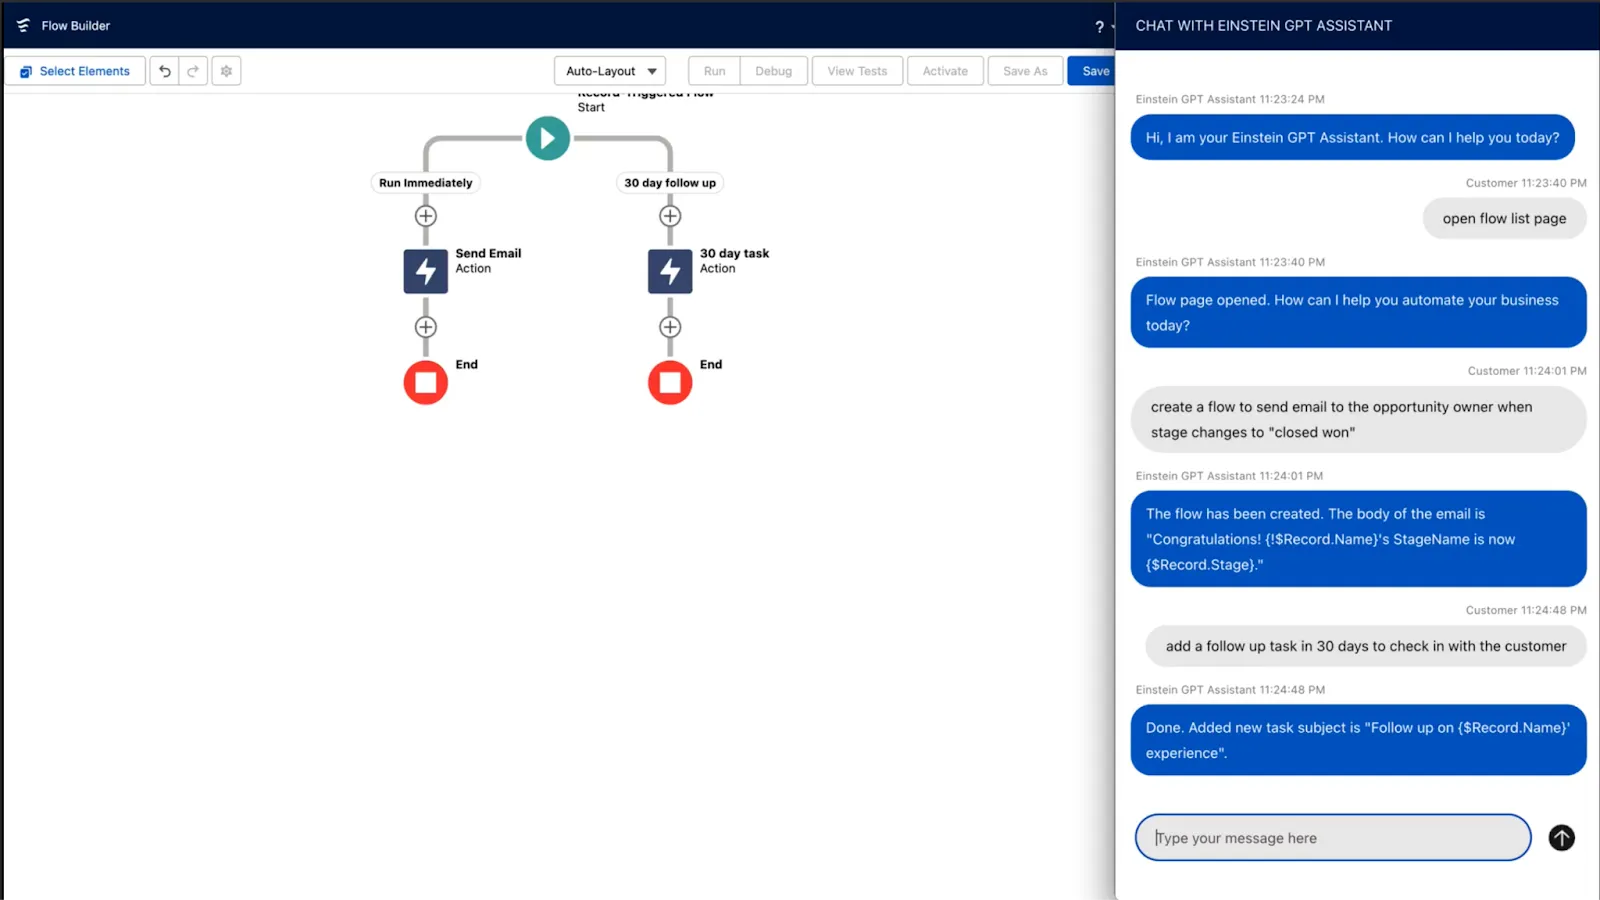
- Check your draft flow for accuracy and safety. You can provide Yes/No feedback by hovering over the Einstein message and selecting 👍 or 👎.
- If you need to make more changes to your Flow, you can either modify the Flow directly (as you would with the manual Flow builder), or select Edit Instructions and modify your instructions. Alternatively, you select Start Over to try again.
- If you’re happy with Einstein’s product, go ahead and debug and test the flow, then select Activate.
2. Add elements to your Flow
Your Flows won’t get you very far unless you add elements to them. If you’re using Einstein to build a Flow, these will often be added automatically based on what Einstein thinks is the best element to meet your needs. You can then edit or modify based on how accurate its decisions are.
If you’re building your Flow manually, you’ll need to add elements yourself. It’s fairly straightforward. In the Toolbox menu on the left-hand side of your screen, select Add element. Then, select and configure the element you want to add.
Here’s a list of all the elements you can add to a new Workflow in Salesforce:
- Action. Launch an available Salesforce action, like "Send Email," "Create Record," "Update Record," and other custom actions you build.
- Apex action. If you’re integrating Apex actions into a Flow, you can call an Apex class if and only if your developers have annotated it with @InvocableMethod.
- Assignment. Set variable values, including collection variables, record variables, record collection variables, and global variables.
- Collection filter. Apply criteria to a collection, which then filters out a new collection containing only items that meet the criteria.
- Collection sort. This element reorders items within a collection so you can limit the number that remain in the collection after the sort.
- Create records. You can create or update a single Salesforce record by using a record variable, or multiple records using a record collection variable.
- Custom error. Create error messages that display either in a window on the record page, or as an inline error on a specific field. Until the error is fixed, the change that triggered the flow is rolled back.
- Get records. Find specific Salesforce records that meet your filter conditions, and store values from those records in variables.
- Decision. This is essentially an “If-then” tree. Your Flow will evaluate a set of conditions, then route users through the Flow depending on the outcomes.
- Delete records. Identify Salesforce records that you want to delete by using the IDs stored in a record variable or record collection variable. Alternatively, you can specify which conditions will qualify records for deletion.
- Email alert. Send an email from a specified template to a static list of recipients (e.g. your sales team).
- Wait. Pause the Flow until specific conditions are met, a set amount of time passes, or at a specific date.
- Recommendation Assignment. If Einstein AI is enabled, you can generate Next Best Action recommendations based on record data, values in collections, or manually entered values.
- Screen. Collect or display information to the user who runs the Flow via a screen.
- Start. Add a trigger that launches the Flow. Without this element, you’ll need another element to autolaunch the Flow—custom buttons, processes, Apex classes, Einstein bots, etc.
- Subflow. Launch another active Flow.
- Transform. Map and transform source data to target data.
- Update records. Identify Salesforce records to update, then set specific values to change in those records. You can use the IDs and field values stored in a record variable or record collection variable, or specify conditions that will set field values for individual records.
Add an element to a Flow in free-form
To add an element to a Flow in free-form, simply drag the element onto the canvas. You’ll then have to connect that element to another element already on the canvas. This will determine the order in which these are executed.
For example, let’s say you want a qualified lead to receive a series of emails after a salesperson has reached out to them, you would want to structure these elements in the following order:
- Send an Email Alert to your internal sales team
- Instruct the workflow to Wait until either the salesperson has logged an attempted contact, or a set amount of time
- Then set up a series of emails to be sent directly to the lead, with a series of Wait elements in between based on your optimal cadence.
Without designating the correct order, you could end up sending the wrong email to the lead at the wrong time. Or, worse, the salesperson won’t receive an alert until long after the 5-minute contact window has passed—and that could lead to a missed opportunity.
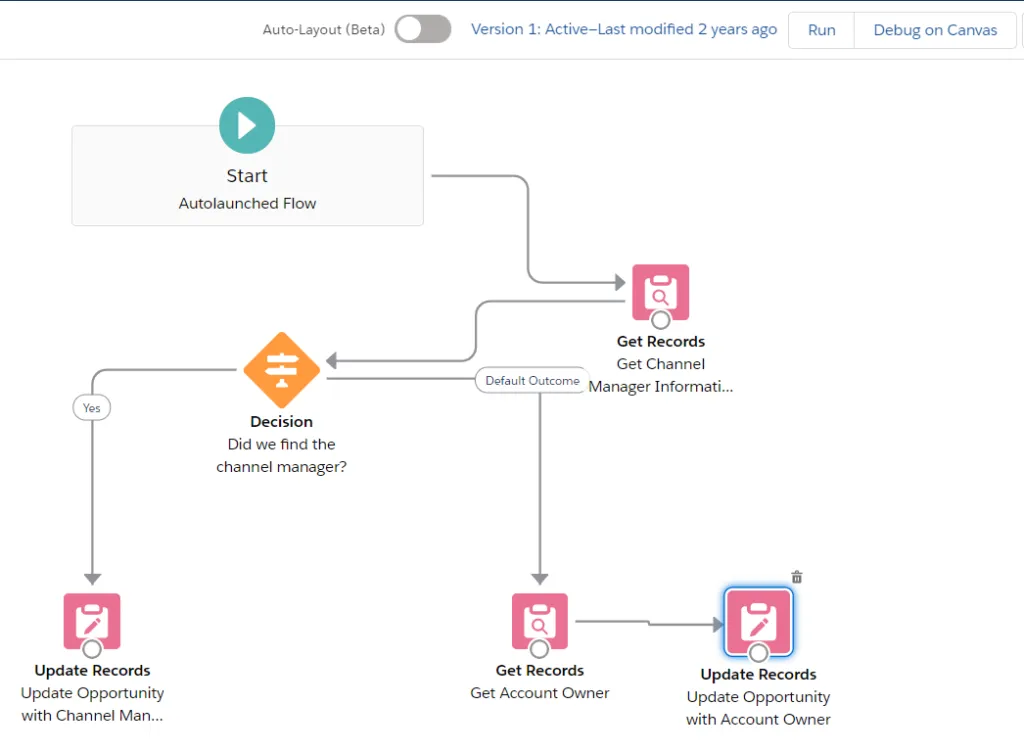
💡Pro tip: Make sure you connect the Start element at the top of the workflow to another element. Otherwise, nothing will happen once the trigger conditions are met.
Add an element to a Flow in auto-layout
The only meaningful difference between Salesforce auto-layout and free-form is that elements are automatically connected to each other in the order they’re added to the canvas.
To add a new element, select the + sign (Add Element) in the place where you want to insert the element, then select which element you want to add. Then configure the element, and select Done.
If you find that you’ve put your element into the wrong place, there’s a simple fix. Just select the element, choose Cut Element. Then, in the new place where you want to put the element, select +, then Paste Element.
3. Save drafts of your flows
If you’re building a Flow in free-form, you won’t be able to save a draft as you go. If you’re using auto-layout, however, you can simply select the Save icon in the top-right hand corner. This saves the Flow without activating it.
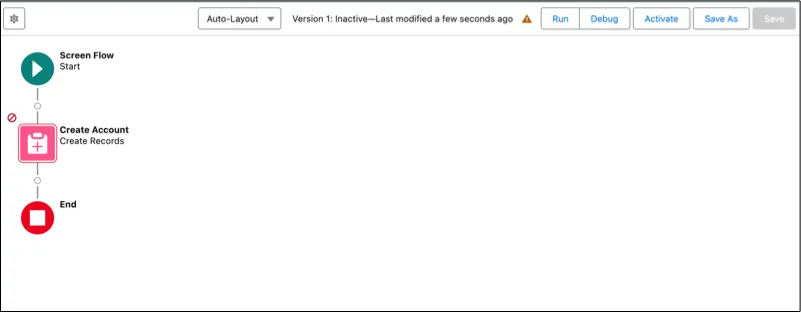
Once you save a draft of your Flow, Salesforce will automatically alert you to any errors it contains. It’s a good idea to go through and fix those before activating it.
4. Define Flow conditions
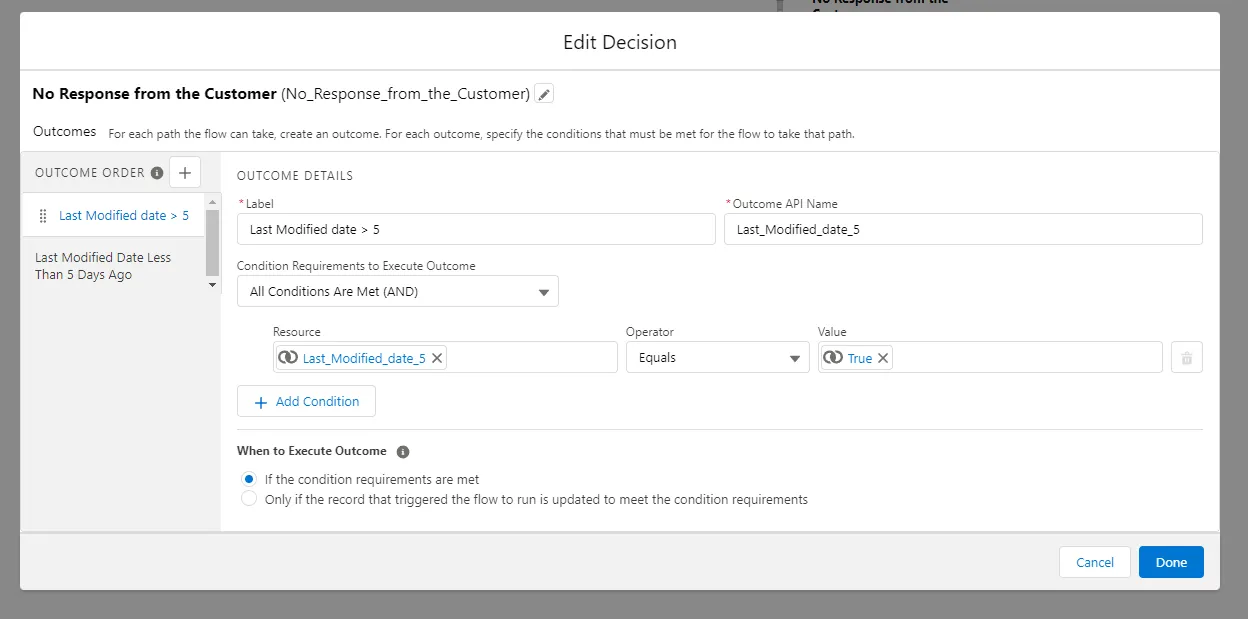
One of Salesforce Flow’s key features is the ability to define conditions that determine whether a specific element is executed for a particular record. You can set up as many conditions for an element as you like, and you can specify the order in which they are applied.
Here are the column headers for a Flow condition:
Resource
The item whose value you want to evaluate. The most common types of resources are variables, collections, and formulas.
Operator
This is the type of condition used to evaluate the resource. Examples include Boolean logic, date/time, number, collection, and text.
Value
The designated data that the operator will evaluate within the resource. This data type must be compatible with the resource.
Once you set those conditions, you then need to specify your condition logic. There are three options available to you:
- Any condition is met. If one of the conditions is false, the Flow doesn’t execute the following element.
- All conditions are met. If only one of the conditions is true, the Flow will execute the following element.
- Custom condition logic. You can set your own condition logic for up to 1,000 characters. Use numbers, parentheses, and AND, OR, and NOT joiners to write your logic, otherwise you’ll end up with an error message.
Setting conditions is critical if you want to customize your workflow to specific user needs or demands.
5. Create Flow formulas
Flow formulas are a powerful feature that can help you engage in complex operations like data transformation, calculations, and complex decision trees. Essentially, formulas are mini-algorithms that use Salesforce-specific data in their calculations.
You can create Flow formulas in two ways: with the Flow formula builder or through Einstein AI. Let’s take a look at how each process works.
Create a formula with the Flow formula builder
We’ll walk through three examples of how to use the formula builder on specific elements: Start, Collections, and Resources. Regardless of which elements you’re using, you’ll choose from a list of functions and operators to build that formula. Some of the more common include:
- Arithmetic operations (+, -, *, /)
- Logic operators (AND, OR, NOT)
- Comparison operators (<, >. <=, >=, ==, !=)
- Text manipulation functions (LEFT, RIGHT, MID, SUBSTITUE)
- Conditional functions (IF, CASE)
- Other utility functions (e.g. ISBLANK, BLANK VALUE, ISPICKVAL). Note: these functions will vary depending on the data you’re working with
For a complete list of available formula functions and operators, click here.
💡Pro tip: As you’re building your formula, be sure to check for errors and revise as you go. This will reduce errors and problems in your workflow in the future.
Follow this step-by-step process to use the Flow formula builder to create a new formula.
- Select the element within your Flow you want to update, then select Edit.
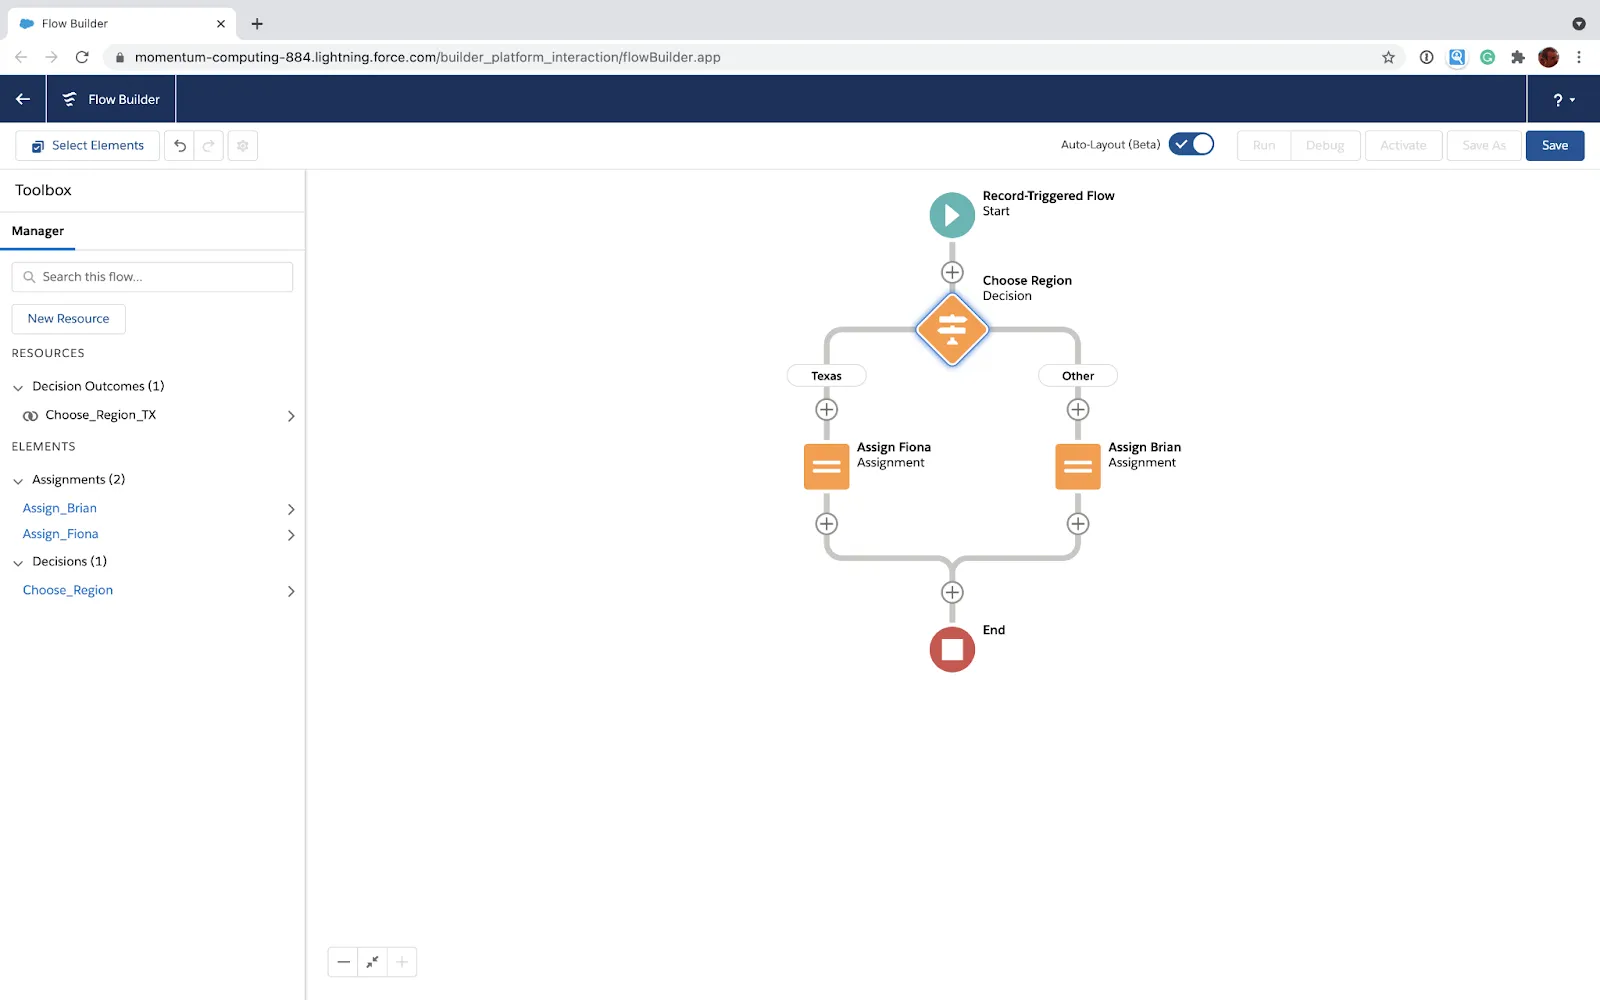
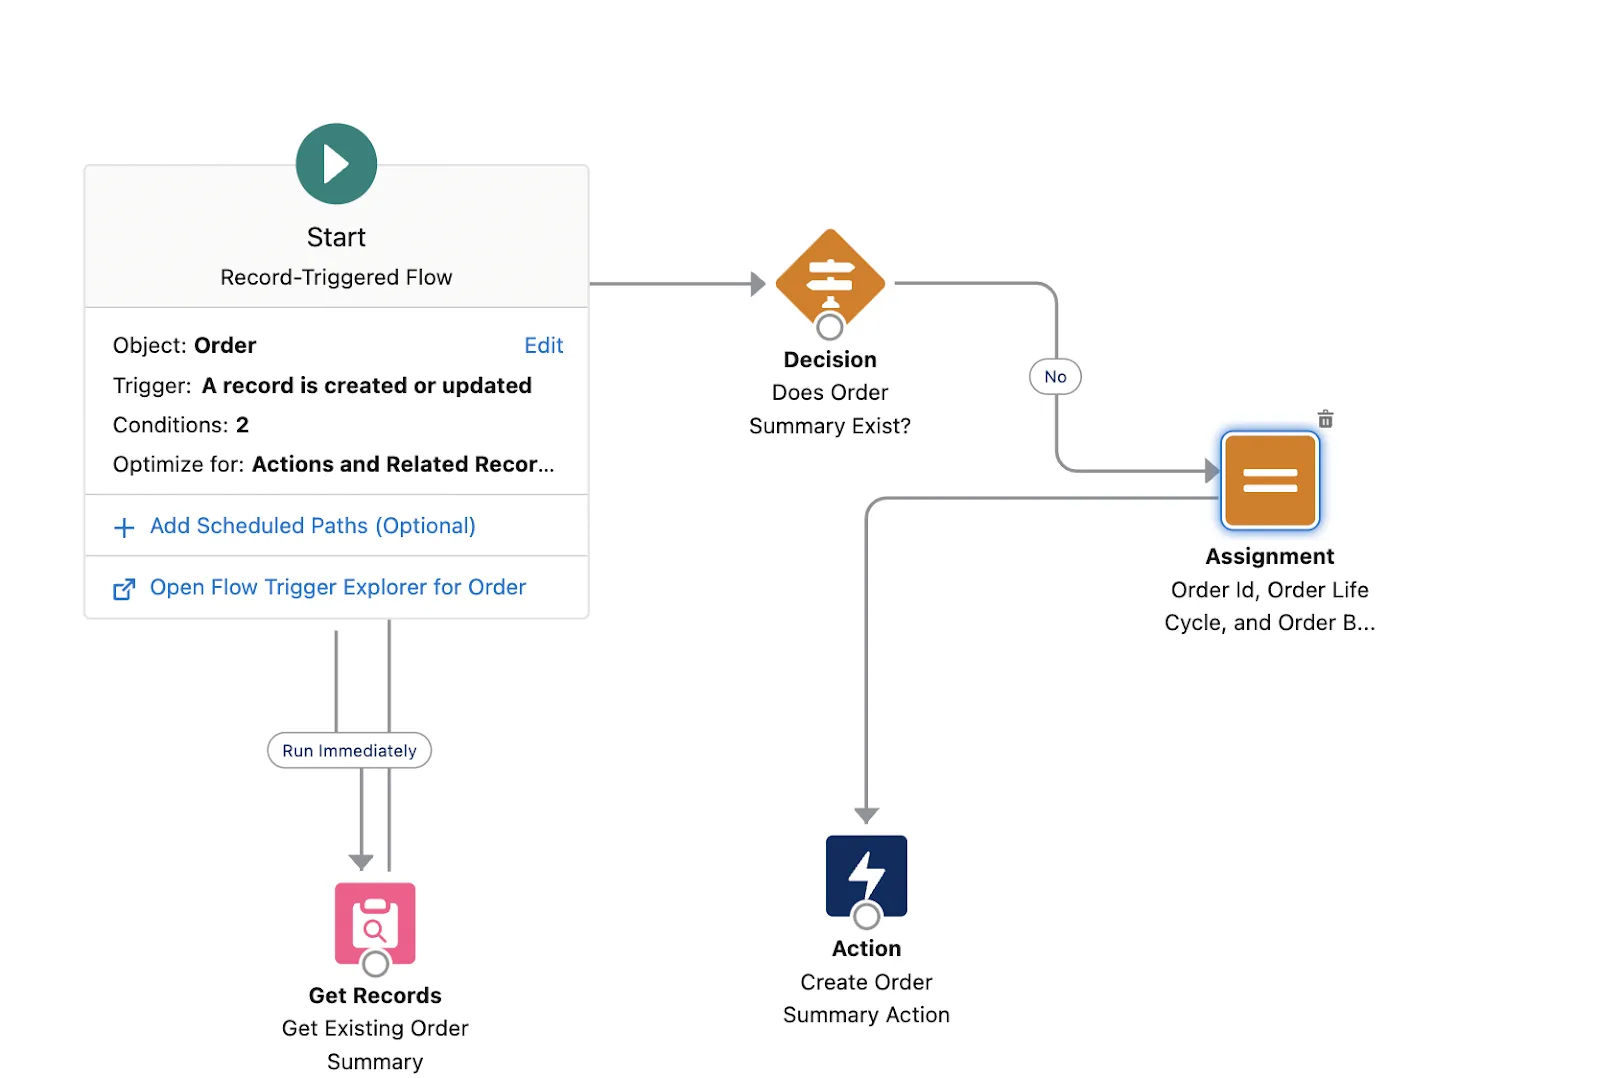
- Navigate to the Trigger section. Then under Set Entry Conditions, set Condition Requirements to Formula Evaluates to True.
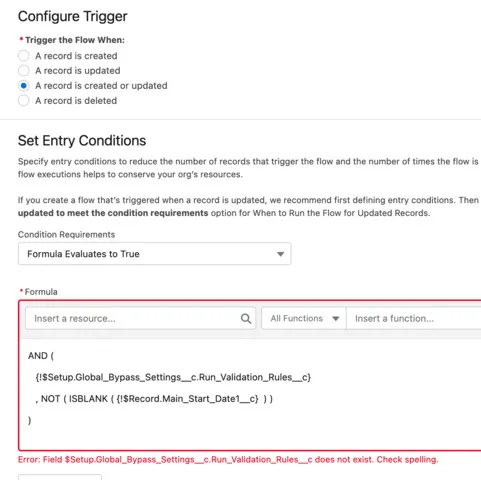
- Then in the Formula Builder, search for a Resource to insert into the function. You can add more than one resource to an expression.
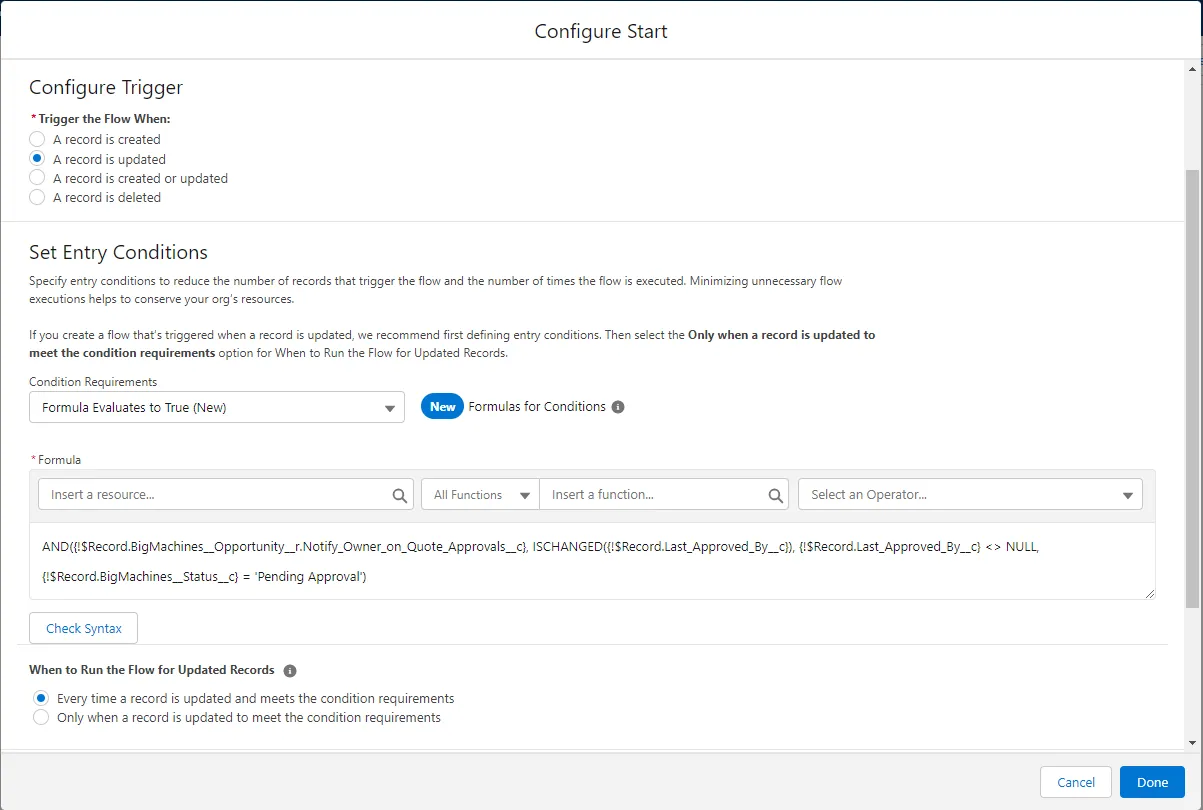
- Insert a function from the list. You can filter functions by category (e.g. conditional, text manipulation).
- Choose an operator from the dropdown menu.
- Once you’ve completed your formula, select Check Syntax. You’ll see one error at a time.
- Once all errors have been corrected, then select Done.
Create a formula with Einstein AI
Additionally, you can create a formula using Einstein AI. Once Einstein AI is activated, then navigate (using the Setup Quick Find box) to Process Automation Settings. Enable formulas to be created by Einstein.
Then, use the following process:
- Navigate to the Set Entry Conditions section and, same as before, select Formulate Evaluates to True.
- In the formula builder, select the Einstein button.
- In the text field that appears, describe the formula you want to build, then select Create.
- You’ll see the formula appear in the formula builder automatically.
- Check the syntax for errors, same as before.
- Then once all errors have been corrected, select Done.
When writing a formula, make sure your description is clear and unambiguous. Use precise names of objects to avoid confusing Einstein and ending up with errors. The best way to do this is to select a resource from the resource menu instead of writing it manually.
If the formula doesn’t work, try writing the prompt differently and seeing what other results come up. It may take a few tries to get it right.
6. Debug your Flow
Even with the most meticulous attention to detail, there’s potential for errors, feedback loops, and broken connections to creep into your Flow. Thankfully, Salesforce has built-in debugging functionality that can help identify issues before you activate it.
Here are some steps you can take to debug your Flow:
- In the Flow Builder, select Debug. The following screen will appear:
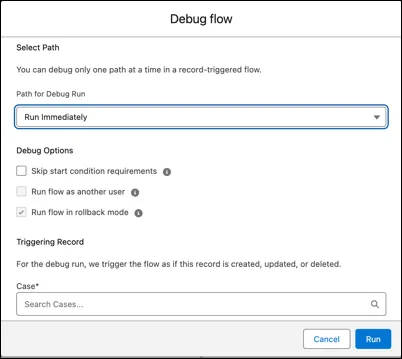
- Configure your debug options. You can run the debugging immediately or late, skip start conditions, run the Flow as a specific user, or run in rollback mode.
💡 Pro tip: Make sure you select rollback mode if your Flow is set up to make any changes to your database. Otherwise, the changes made in the debugging process will be permanent.
- Select Run. On the right-hand side of the screen, you’ll see a list of debug details. Use these details to determine whether you need to make changes to your Flow.
For more specific guidance for debugging different Flow types, consult the following Salesforce documentation:
7. Set conditions for when a Flow fails
Broken Flows can expose your business to serious risk. Leads may not be routed to the correct sales rep, meetings may not make it onto a calendar, or follow-up emails may go unsent. This can result in dropoff, revenue leakage, and dissatisfaction among your user base.
If a Flow fails, you’ll want to make sure you have a process in place to notify users of the failure so they can resolve it. When this happens, the user running the Flow will receive the following message:
An unhandled fault has occurred in this flow
An unhandled fault has occurred while processing
the flow. Please contact your system administrator for more information.
The admin who originally created the Flow, on the other hand, will receive the following message in a fault email detailing where the error occurred:
An error occurred at element Delete_1.
DELETE --- There is nothing in Salesforce matching your
delete criteria.
The fault email should contain a link that reads as the following: Flow Error: Click here to debug the error in Flow Builder. However, this may not appear for every Flow type.
Before these errors occur, you can set up processes for how to handle and resolve them. The first place to start is configuring your fault paths so the right person receives the error message:
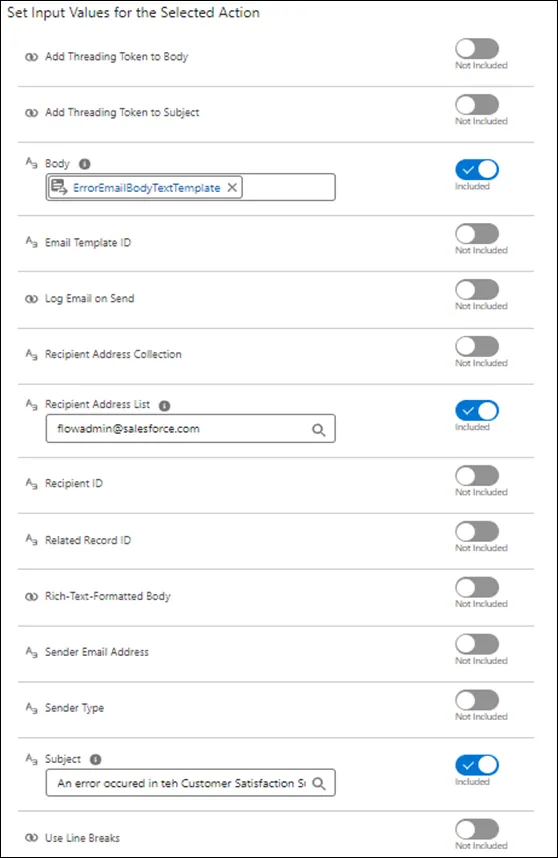
- Start by creating a text template that includes the current values of the Flow’s resources. These will give your admin insight into where exactly the Flow failed. For example:
Error: {!$Flow.FaultMessage}
RESOURCE VALUES
Customer Response: {!CustomerResponseRadioButtons}
Value of Decision's Yes outcome: {!IsWantsToParticipate}
Company: {!CompanyNameText}
Satisfaction: {!SatisfactionPicklist}
Service: {!ServiceText}}
Other Comments:
{!OtherCommentsText}
- Then you’ll want to add a fault path to elements in your Flow. This will end the Flow if a fault occurs, preventing future activities from taking place.
- Once you create a fault path, add a Send Email element, then insert the name of the template and select the person(s) who should receive that error email.
- Repeat this process for every element where a fault can occur.
Glossary: terms to understand when using Salesforce Flows
Salesforce Flow is an ever-evolving product, which means the terminology used to describe it is also in flux. Here are some key terminology that you may have come across in the past, and how they relate to the current iteration of Flow.
Lightning Flow
Lightning Flow is the former name given to Salesforce Flows, and is an application that automates business processes. It uses complex logic that operates through declarative tools or configurations.
Flow Builder
The Flow Builder is the user interface used to create Salesforce Flows. It replaces the Process Builder in Salesforce, which has been phasing out for over a year now.
Cloud Flow designer
Like Lightning Flow, the Cloud Flow designer is a former Salesforce visual workflow tool that’s been replaced with the current iteration of the Flow Builder.
Visual Workflow
Visual Workflow was an early-stage version of what is now called Salesforce Flow. It was notable because it offered the first iteration of a drag-and-drop interface for automations and workflows, whereas previously users had to use a rules-based logic.
Key features in Salesforce visual Flows
Although we’ve touched on some of Salesforce Flow’s key features in our how-to guide, here’s a rundown of some of the most important ones for marketing and sales leaders.
Real-time workflow triggers and actions
Salesforce Flows function in real time. This enables you to automate complex processes that involve multiple objects in a matter of seconds. If you want your Flow to delay certain actions (e.g. Send Email), you’ll need to add a Wait action to the Flow. Otherwise, all the actions will occur in sequence.
Complex, customizable logic
As you’ve no doubt surmised while reading our relatively stripped-down explanation of Salesforce Flow, there is a great deal of customization and complexity available to you. On the one hand, this is excellent for large organizations with plenty of internal resources to configure complex automation logic to handle a wide range of verticals and ICPs.
On the other hand, setting up this logic can be challenging for users who aren’t intimately acquainted with Salesforce. Some knowledge of Apex, Boolean logic, formula-building, and other more technical concepts is needed if you want to fully customize your flows.
Drag-and-drop interface
Salesforce Flow includes a straightforward drag-and-drop interface that’s excellent for building simple flows. But looks can be deceiving. While, yes, it’s relatively easy to build simple, linear automations with the drag-and-drop feature, once you go beyond that it becomes a beast to handle.
In-flow data transformation
Salesforce Flows include the Transform element, which enables simple but powerful data manipulation directly within your Flow. This can include data mapping, formula application to modify data values, processing data collections, aggregate calculations, and more.
Security features
To direct and control access to Flows, Salesforce offers a range of security features. These include permission-based, flow-specific access, input validation, API access restrictions and, most importantly, a secure-by-default approach.
How to build better Salesforce visual workflows with Default
Despite all the capabilities that Salesforce Flows have to offer, it can be challenging to build complex workflows with this tool. It’s especially difficult when integrating other tools in your RevOps tech stack.
Default’s no-code, drag-and-drop interface helps you build visual inbound marketing and sales workflows faster and more efficiently than Salesforce’s native functionality. What’s more, Default is built to orchestrate your entire tech stack—including lead qualification software, lead routing tools, automated scheduling, and more—with Salesforce.
If you want to keep Salesforce as your central CRM, but also want to build automations without expending significant developer resources, Default is your best bet. Schedule a demo to see the platform in action today.
Conclusion

Former pro Olympic athlete turned growth marketer. Previously worked at Chili Piper and co-founded my own company before joining Default two years ago.
Run revenue as an engineered system
Revamp inbound with easier routing, actionable intent, and faster scheduling




.png)

