Try Default

See how revenue teams automate revenue operations with Default.

Key Takeaways
- Duplicate records in Salesforce create inefficiencies—from sales disputes over account ownership to automation failures that misroute deals or emails.
- Finding and removing duplicates is critical for CRM hygiene to maintain accurate reporting, prevent sales conflicts, and avoid automation errors that cost time and leads.
- Salesforce offers built-in tools like Duplicate and Matching Rules to detect and prevent duplicates, but they require proper setup and maintenance.
- Third-party solutions like Default provide a more advanced, automated approach, ensuring duplicates are caught before they disrupt workflows.
- A proactive approach to deduplication—with the right tools, rules, and best practices—keeps your CRM clean and your sales team focused on selling, not troubleshooting.
Duplicate records in Salesforce don’t just clutter your CRM—they break your sales engine.
Picture this: a rep celebrates a $10k deal, only to find out the account already exists under someone else’s name. Cue the confusion, the commission dispute, and the loss of trust in your CRM.
But it doesn’t stop there.
Duplicates derail automation. When workflows rely on unique identifiers—like emails or company names—they can pull the wrong record or fail completely. It’s a fast track to missed opportunities, especially during inbound lead qualification, where speed and accuracy are everything.
For teams managing a modern RevOps tech stack, duplicates destroy the integrity of your data.
Without a reliable single source of truth, systems like lead routing software falter—causing misassigned accounts, redundant outreach, or worse, delaying follow-up on leads that are ready to buy.
This article breaks down why duplicates happen, how to remove them, and most importantly, how to stop them from entering your CRM in the first place. Let’s get your data—and your sales team—back on track.
How do duplicate records occur in Salesforce?
Duplicate records in Salesforce happen more often than you’d think, and they’re not just a minor inconvenience—they create reporting inaccuracies, automation failures, and sales conflicts. Understanding how they originate is the first step in preventing them.
Common causes include:
- Manual entry mistakes – Sales reps or customer service teams may unknowingly create duplicate records when adding new leads, contacts, or accounts.
- Inbound lead capture – When an existing account or contact fills out a form or signs up again, Salesforce may not always match it to the right record, leading to issues with lead conversion in Salesforce if the same prospect enters the pipeline multiple times.
(For example, companies often use multiple domain names across their websites and email addresses: jill@XYZcorp.com and jill@XYZcorporation.com. This same person interacting at different times could easily result in duplicate lead, contact, and company records.) - Data imports – Bulk uploads from external sources (marketing lists, event sign-ups, purchased lead lists) can introduce duplicate records if not properly matched.
- Integration issues – Third-party tools, like marketing automation platforms, may sync data inconsistently, creating duplicates when Salesforce doesn’t recognize the existing record.
- Lack of duplicate prevention rules – Without properly configured Matching and Duplicate Rules, Salesforce allows near-identical records to coexist, leading to inefficiencies in processes like Salesforce lead scoring, where duplicates can skew prioritization models.
Without a clear deduplication strategy, these issues compound over time, bloating your CRM and making it harder to track engagement and revenue accurately.
How to find duplicate records in Salesforce
Duplicate records can be hard to spot, especially in large CRMs with thousands of leads, contacts, and accounts. Salesforce provides built-in tools to help identify them, but knowing where to look is key.
Below are the main methods to find duplicate records in Salesforce:
1. Using Salesforce Duplicate Rules Report (Recommended)
Duplicate records can be hard to spot—especially in large CRMs with thousands of leads, contacts, and accounts. Salesforce offers a few built-in methods to help identify duplicates, each suited to different use cases.
1. Use the Duplicate Rules Report (Recommended)
This is the most reliable method if you already have Matching Rules configured in Salesforce. The Duplicate Rules Report flags potential duplicates based on those rules, helping teams proactively identify issues before they create downstream problems.
To access it:
- Go to Setup > Duplicate Rules
- Click View Report next to any active rule
- Review flagged records and take action
This method is ideal for teams that want to automate duplicate detection and prevent issues in reporting, automation, or lead ownership.
2. Run a Custom Report with Filters
If you don’t have Duplicate Rules set up—or need a quick audit—running a filtered report is a useful manual workaround.
To create one:
- Go to Reports > New Report
- Choose Leads, Contacts, or Accounts as the report type
- Add filters like “Email equals” or “Company Name contains”
- Save and scan for potential duplicates
This ad hoc method is helpful for QA spot checks, one-off investigations, or smaller teams without a fully configured rule set.
How to deduplicate your Salesforce records
Identifying duplicates is only half the battle—the real challenge is removing them without breaking things.
Done wrong, deduplication can trigger data loss, rep disputes, and broken automation.
Done right, it gives you a cleaner pipeline, better reporting, and a sales team that trusts their tools.
Below are the most effective ways to remove duplicates in Salesforce without compromising data integrity or momentum.
1. Merging Duplicate Records Manually (Recommended)
Salesforce allows you to manually merge duplicates, so key data points are retained while removing redundant records.
To merge records:
- Navigate to the duplicate record set (under the lead, contact, or account).
- Click Compare and Merge to review differences.
- Select the master record (the version you want to keep).
- Choose which field values to retain, then click Merge.
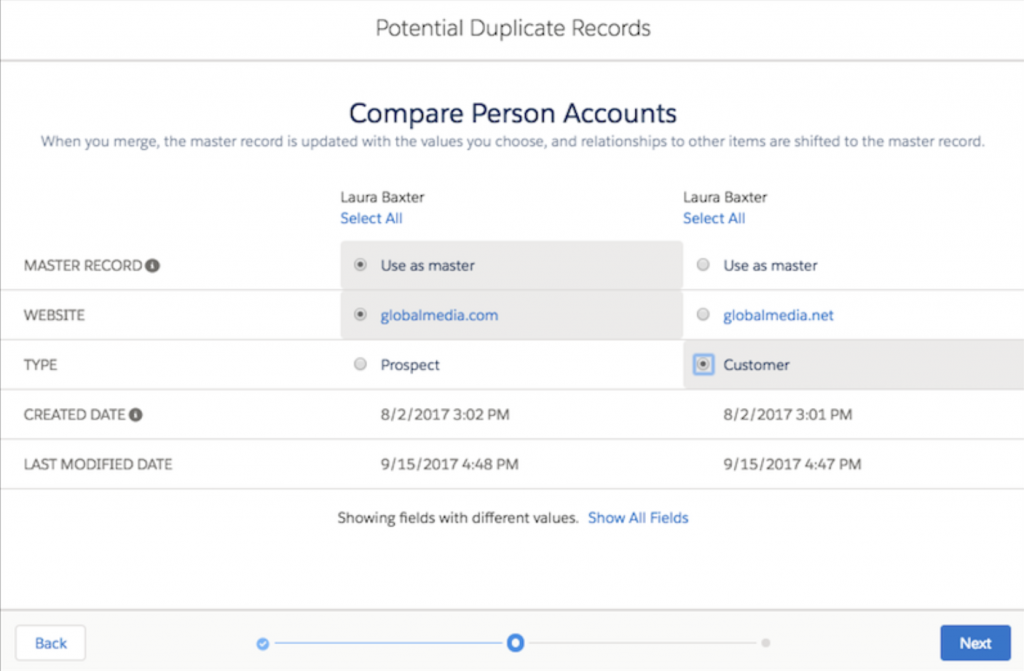
This method is ideal when duplicates need careful review before merging, particularly in high-value accounts where incorrect merges can impact revenue tracking.
2. Using Salesforce Duplicate Jobs (For Bulk Deduplication)
For large-scale deduplication, Duplicate Jobs (available in Salesforce’s Data.com Clean or Einstein for Sales) allow you to automate the process.
To use Duplicate Jobs:
- Go to Setup > Duplicate Jobs.
- Select the object you want to clean (e.g., Leads, Contacts, Accounts).
- Apply Matching Rules to detect duplicates.
- Review and merge records in bulk.
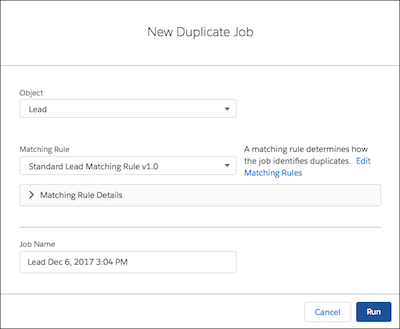
This is a time-saving option for teams managing high-volume data, helping to maintain CRM hygiene without manual effort.
How to stop duplicate records from happening: Creating Salesforce Duplicate Rules
Prevention always beats cleanup—especially when scale is involved. If you’re relying on manual checks or post-entry cleanups, you’re already behind. Salesforce Duplicate Rules give you the power to catch duplicates at the point of entry, before they have a chance to pollute your pipeline or derail workflows.
Here’s how to set up the guardrails that keep your CRM data clean from day one.
1. Navigate to Duplicate Rules in Setup
- In Salesforce, go to Setup.
- In the Quick Find box, search for Duplicate Rules and select it.
- Click New Rule and choose the object you want to apply it to (Leads, Contacts, Accounts, etc.).
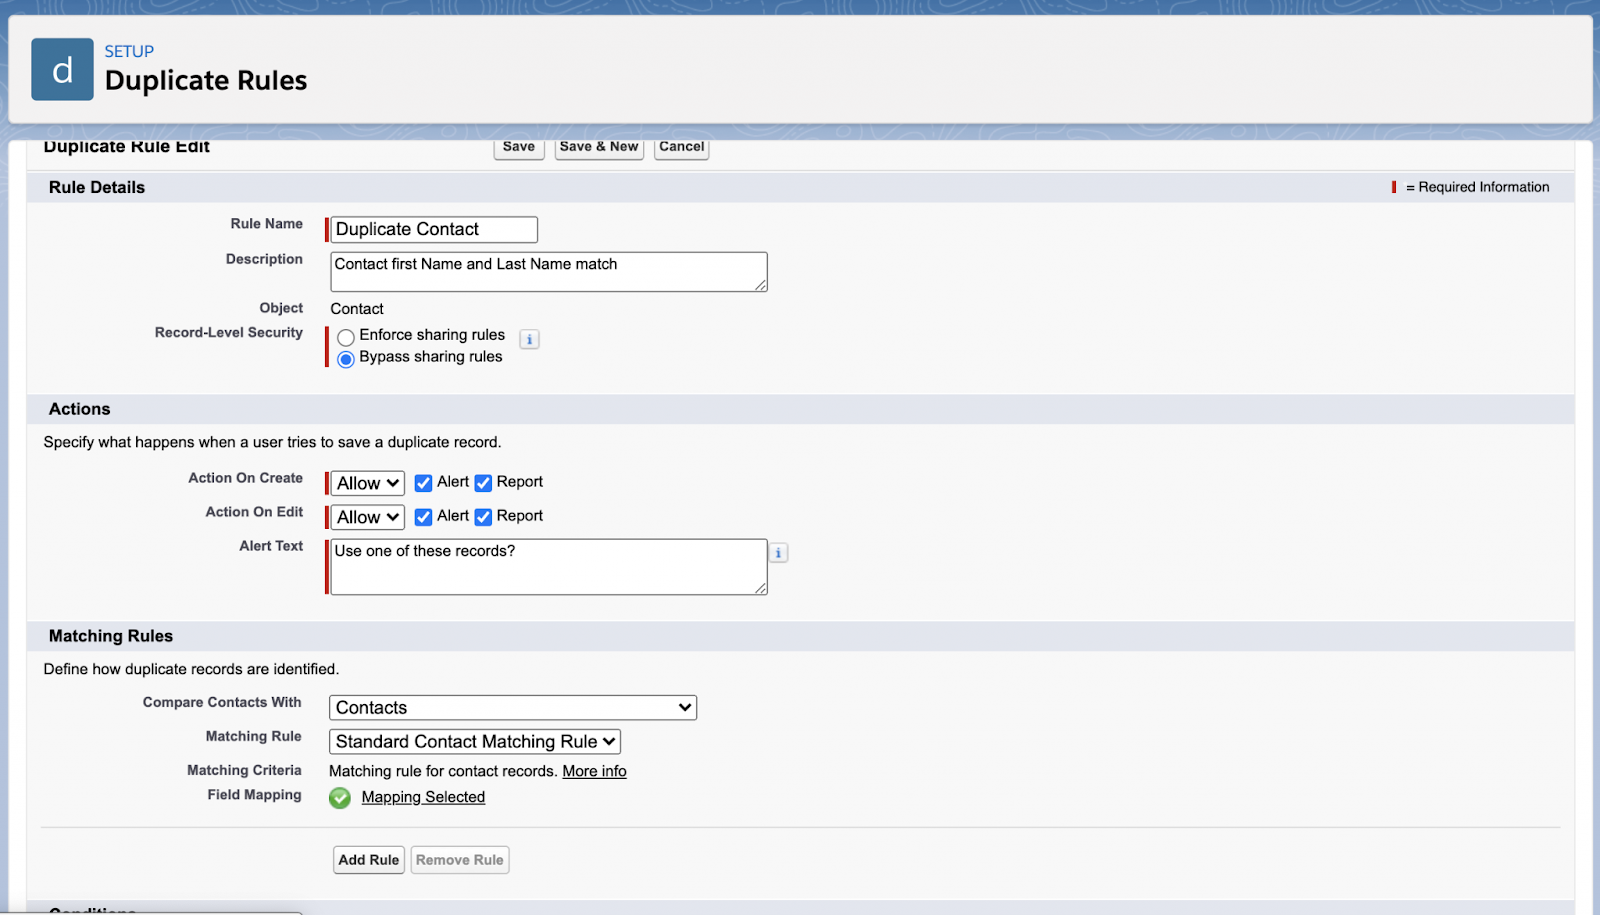
This is where you define how Salesforce detects and manages duplicates. You’ll set specific conditions and define whether duplicates should be flagged, blocked, or allowed with a warning.
2. Define Your Matching Criteria
- Select a Matching Rule that determines how Salesforce identifies duplicates.
- Choose from standard Matching Rules (email, name, phone) or create a custom rule to fit your data needs.
- Specify which fields must match to trigger the duplicate alert (e.g., same company name + same email).
Matching Rules tell Salesforce what to look for, ensuring duplicates aren’t flagged unnecessarily while still catching real issues.
3. Set the Duplicate Rule Actions
- Under Actions, define how Salesforce should handle duplicates:
- Block: Prevents duplicate record creation entirely.
- Allow & Alert: Lets the record be created but warns the user.
- Report Only: Flags duplicates in a report but takes no immediate action.
- Choose whether the rule applies to all users or specific profiles (e.g., block for SDRs but allow admins to override).

This step keeps data governance rules aligned with your sales workflow—preventing duplicates without disrupting legitimate data entry.
4. Activate the Rule & Monitor Results
- Click Save & Activate to enable your Duplicate Rule.
- Test by trying to create a known duplicate record.
- Monitor flagged duplicates using Duplicate Reports in Salesforce.
Top tip: Regularly reviewing flagged records ensures your rules are working effectively. If duplicates continue slipping through, tweak your Matching Rules for better accuracy.
Differences between Duplicate Rules vs Matching Rules
While Duplicate Rules and Matching Rules work together to prevent duplicate records in Salesforce, they serve different purposes. Understanding their roles is crucial for fine-tuning your deduplication strategy and accurate data management.
Duplicate Rules
Duplicate Rules control what happens when Salesforce detects a duplicate record. They determine whether a duplicate is blocked, flagged, or allowed with a warning based on predefined criteria.
Key functions:
- Set duplicate detection policies (e.g., block SDRs from creating duplicate accounts).
- Allow flexibility by applying different rules to specific user profiles.
- Work in tandem with Matching Rules to take action when duplicates are found.
Without properly configured Duplicate Rules, Salesforce may fail to alert users about duplicates, leading to data inconsistencies and misassigned accounts.
Matching Rules
Matching Rules define how Salesforce identifies duplicates by specifying which fields must match. These rules use exact matches or fuzzy logic to compare records and flag potential duplicates.
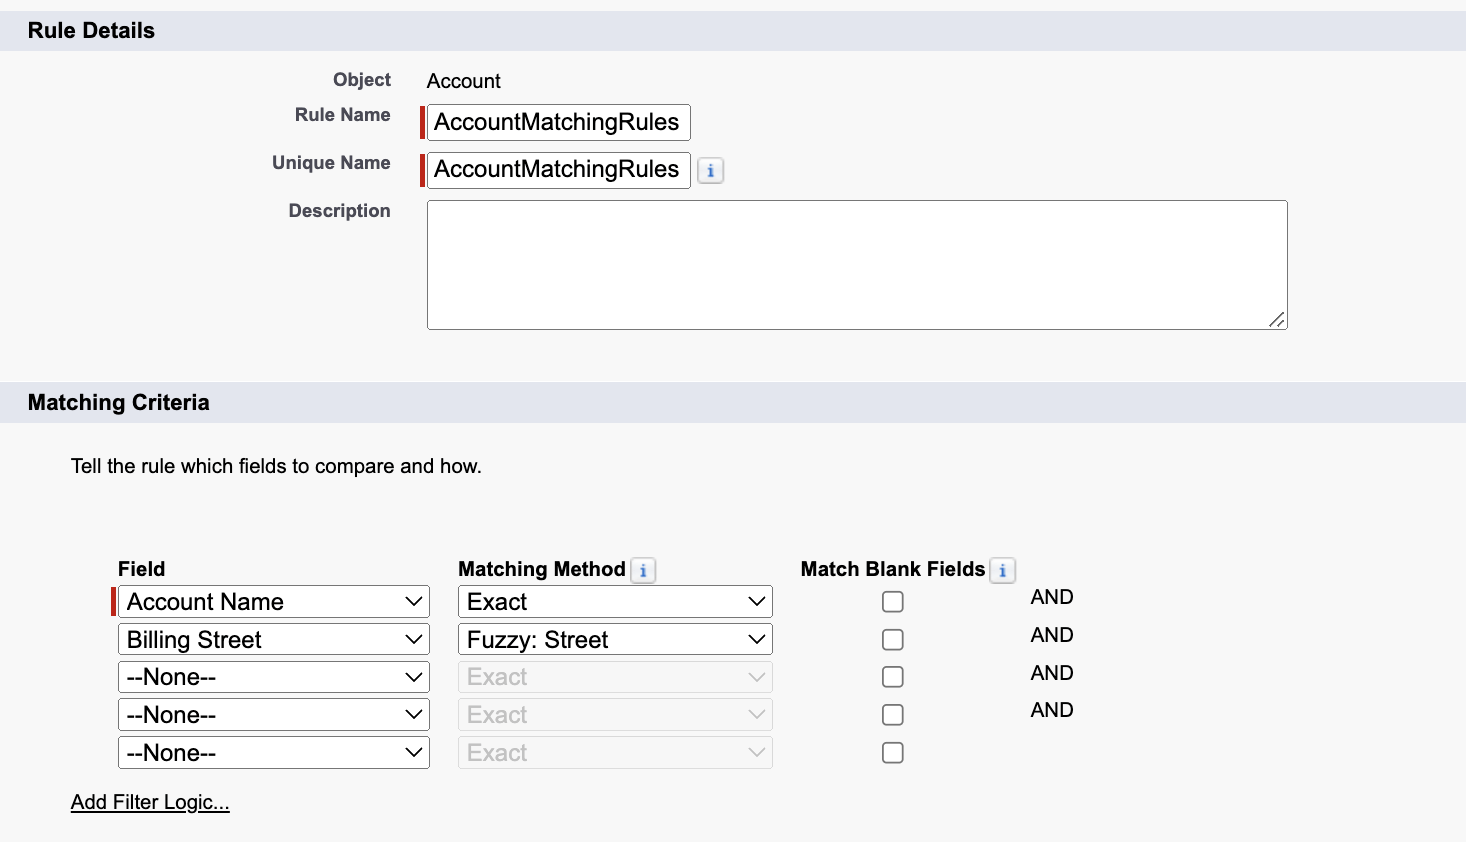
Key functions:
- Define which fields must match (e.g., same company name + same email).
- Use standard rules (email, name, phone) or create custom rules to refine detection.
- Power Duplicate Rules, for accurate identification before action is taken.
Without properly tuned Matching Rules, Salesforce may flag false positives or miss real duplicates, leading to inconsistent deduplication.
Merging your duplicate Salesforce data: Step-by-step
Even with Duplicate Rules in place, some duplicates will still slip through. Merging duplicate records ensures data accuracy, prevents sales conflicts, and avoids automation failures. Below is a step-by-step guide to merging duplicates in Salesforce.
Step #1: Identify the records to merge
- Navigate to the Leads, Contacts, or Accounts tab.
- Search for the duplicate records using filters like email, company name, or phone number.
- If using Duplicate Reports, open the flagged duplicates for review.
Before merging, review each record carefully—incorrect merges can erase valuable data or reassign ownership incorrectly, disrupting workflows.
Step #2: Open the Merge Tool
- Select the duplicate records you want to merge.
- Click Merge (this option appears only when duplicates exist for the same record type).
- If merging accounts, go to Accounts > Merge Accounts in Setup.
The Merge Tool provides a side-by-side comparison, allowing you to retain key data fields and eliminate outdated or duplicate information.
Step #3: Choose the Master Record
- Select the record that should be the primary (master) record—this will be the one that remains after the merge.
- Salesforce will prompt you to choose which data fields to keep from the duplicate records.
- Click Next to finalize selections.
Choosing the right Master Record is crucial—merging into the wrong record can overwrite correct information and create data inconsistencies in reporting.
Step #4: Finalize and merge the records
- Review all selected field values one last time.
- Click Merge to complete the process.
- Refresh the page to ensure only one consolidated record remains.
Salesforce logs all merges in the system history, but merges cannot be undone, so it’s essential to review changes before finalizing.
Step #5: Monitor merged records for accuracy
- After merging, run a quick report to verify that the correct record remains.
- Check for any missing data—if important details were lost, update the record manually.
- If using automation, test workflows to make sure they reference the correct record post-merge.
A structured post-merge review keeps your CRM data stays clean, reliable, and automation-ready.
Tools for keeping on top of Salesforce duplicates
Even with Salesforce’s built-in deduplication tools, managing duplicates at scale isn’t sustainable without automation. You can enrich leads all day long—but if you're not preventing duplicates, you’re just polishing bad data.
For teams running inbound marketing tools, sales workflow software, or inbound marketing automation, the risk is the same: duplicate records silently break lead routing, clutter pipelines, and erode trust in your CRM. Clean data isn’t a nice-to-have—it’s the foundation of operational efficiency and revenue growth.
Below are the most effective tools for keeping your Salesforce data clean and your go-to-market engine running smoothly.
Solution #1: Default
Default gives Sales Ops and RevOps teams the control Salesforce lacks.
Where native tools rely on static rules and reactive cleanup, Default is built to stop duplicates at the source—before they compromise your pipeline, reporting, or revenue. It's the foundation for any team serious about scale, precision, and speed.
Default ensures only the right leads enter your CRM—and they only enter once.
Why teams rely on Default:
- Real-time duplicate detection – Flags existing records instantly, avoiding conflicts in lead distribution software and preserving account ownership.
- Automated merging – Cleans your CRM without the manual lift.
- Customizable fuzzy matching – Smarter than Salesforce’s defaults, and adaptable to your data quirks.
- Seamless Salesforce integration – No extra setup. No API gymnastics. Just clean data, automatically.
When your reps trust their data, they sell faster. With Default, they don’t waste time double-checking records—they just close.
Solution #2: DemandTools
DemandTools is a powerful data management platform that offers bulk deduplication, record standardization, and mass data updates for Salesforce.
- Batch deduplication – Cleans up existing duplicate records in bulk.
- Flexible data matching – Allows custom rules to refine duplicate detection.
- Scheduled automation – Runs deduplication processes at set intervals to maintain CRM hygiene.
Best for teams that need manual control over mass deduplication without disrupting workflows.
Solution #3: Cloudingo
Cloudingo simplifies bulk deduplication, data cleansing, and workflow automation within Salesforce.
- Merge duplicate records in bulk while retaining key data.
- Custom automation rules to prevent duplicates at the entry point.
- Dashboard visibility into potential duplicate records for quick action.
Ideal for teams that need a balance between automation and manual control over duplicate management.
Solution #4: Ringlead
Ringlead is a data enrichment and deduplication platform designed to optimize Salesforce data quality.
- Real-time deduplication when importing or syncing external data.
- Data enrichment tools to fill in missing details and improve record accuracy.
- Duplicate prevention for lead routing
Best for organizations that ingest large volumes of data and need advanced deduplication rules.
Best practices and tips to avoid duplicate records in Salesforce
Preventing duplicates isn’t just about cleaning data—it’s about protecting revenue, automating confidently, and giving your team a CRM they can trust. Here’s how to build a prevention strategy that actually works.
1. Enforce strict data entry standards
- Most duplicates start at the point of entry. Train reps to follow standardized conventions for key fields—like spelling out company names fully, using work emails only, and avoiding placeholder text.
Top tip: Reinforce this with picklists, input masks, and validation rules for fields like region, job title, or lead source. The fewer free-text fields, the better.
2. Catch duplicates in real time
- Waiting until after records are in your CRM is too late. Configure Matching Rules to identify duplicates based on high-signal fields like email, domain, or phone number.
- Pair these with Duplicate Rules that either block or warn users based on role—for example, letting admins override, but preventing reps from pushing through duplicates.
Top tip: For more control, integrate Default to stop duplicates across leads, contacts, and accounts before they’re ever created—especially valuable in high-volume inbound scenarios.
3. Make data cleanup a recurring habit
- Even with rules in place, some duplicates will still get through. Schedule weekly or monthly Duplicate Reports to review flagged records and ensure nothing critical is slipping.
4. Control who can override or merge
- Accidental merges can be just as damaging as duplicates. Restrict override permissions to experienced users and admins.
- Create a clear protocol for how and when records can be merged—and by whom. And makes sure SDRs and AEs are trained to flag suspected duplicates rather than guessing or bypassing warnings.
5. Automate wherever you can
- Manual cleanup doesn’t scale. Set up scheduled deduplication jobs to run in the background, ideally during off-hours to avoid workflow disruptions.
- Use alerts to flag duplicate-prone activity—like multiple leads from the same domain or back-to-back imports with overlapping fields. The earlier you catch it, the less damage it does.
A proactive deduplication strategy reduces data firefighting, protects lead flow, and keeps your automation, routing, and reporting all working exactly as intended.
Keep your Salesforce data clean with Default
Duplicate records don’t just clutter your CRM—they disrupt workflows, trigger sales conflicts, and undermine revenue reporting.
Salesforce’s built-in tools offer a starting point, but they fall short when it comes to real-time prevention and intelligent automation.
That’s where Default comes in.
With real-time duplicate detection, automated merging, and advanced Matching Rules, Default helps Sales Ops and RevOps teams maintain a clean, reliable CRM—without the manual overhead.
Why leading teams choose Default:
- Prevent duplicates before they enter your CRM
- Eliminate manual cleanup with intelligent automation
- Accelerate sales by giving reps access to clean, trusted data
This isn’t just about data hygiene—it’s about enabling faster lead routing, cleaner reporting, and a CRM your sales team actually trusts.
Book your demo today and start scaling with clean data.
Conclusion

Former pro Olympic athlete turned growth marketer. Previously worked at Chili Piper and co-founded my own company before joining Default two years ago.
Run revenue as an engineered system
Revamp inbound with easier routing, actionable intent, and faster scheduling




.png)

