Try Default

See how revenue teams automate revenue operations with Default.

Key Takeaways
After scoring and qualifying a lead in HubSpot, it’s critical to get that lead to a salesperson as quickly as possible. Just a few minutes’ delay can dramatically reduce your odds of closing the deal. So if HubSpot is your RevOps platform of choice, you need to be fully up-to-speed on HubSpot lead routing.
So how exactly does HubSpot distribute leads to sales reps? Are you limited to round-robin rules, or is there more flexibility? And if you’re not happy with the platform’s native routing features, which alternatives offer more sophisticated workflows? Read on to answer all those questions and more.
→ Embed Product Page CTA 🚨
What is lead routing?
Lead routing (sometimes called lead distribution) is the process of assigning new leads to a sales rep. Different sales teams route leads differently, but common factors in determining routing rules include rep availability, fairness, and which rep is best positioned to convert that lead into a customer.
While it’s theoretically possible to handle lead routing manually, it becomes impractical once you start scaling your inbound flow. One person can’t handle hundreds of inbound leads without creating serious bottlenecks. In that case, most organizations often turn to automated lead scoring models and distribution software.
Some benefits of automated lead routing include:
- Reduced manual work for your team
- Faster response times, as leads are assigned within minutes post-conversion
- Higher sales productivity, as reps can immediately nurture, pipeline, and close the lead
- Improved lead management, as leads are distributed quickly, fairly, and with less dropoff
- Scalable processes that accommodate a rapidly growing number of leads
- Use of data to drive the lead routing process, which removes bias and subjectivity from the process
Key considerations when building your lead routing processes
Before you set up your lead distribution processes in HubSpot, consider the following factors. Failure to take them into account can result in major issues down the line. Plus, addressing them can improve cross-functional clarity and alignment, reducing organizational friction over the long haul.
Routing rules
Before you set up lead routing in HubSpot, figure out where and how you’re going to route leads. Let’s assume that if you’re using automated sales workflow software for lead distribution, you’re not using the “shark tank” or “cherry picking” models.
Which means you’re probably going after one of these three approaches:
- Basic round robin. This approach is simple and straightforward: it’s just like dealing cards. Each rep gets assigned a lead before any one rep is assigned a new one.
- Flexible, weighted, or custom round robin. Flexible round robin allows leads to choose available reps, weighted round robin distributes leads to certain reps more than others, and custom round robin enables you to implement rules and filters when assigning leads.
- Rules-based routing. Unlike round robin, there’s nothing “equal” about rules-based routing. Leads are assigned to certain reps if they meet specific criteria—territory, industry, etc.
Data comprehensiveness, quality, & governance
If you implement any other lead routing system than round robin, you’re going to lean heavily on HubSpot data to inform your routing rules, inbound lead qualification, and other automated functions. Using lead qualification software can also be used to help automate this.
So it’s important to take your data comprehensiveness and quality into consideration before setting up routing rules. Do you have enough data to accurately identify a lead’s job description, or whether the account is a transactional or enterprise sales opportunity? If not, you’ll need a lead enrichment solution to fill in the gaps.
What’s more, 25% of CRM managers claim that less than half of their data is accurate and complete. Odds are you’re probably overestimating your database quality. If you don’t clean up your data before setting up routing rules, you’re seriously compromising lead routing effectiveness.
Plus, if you don’t fix your data governance procedures before enriching or cleaning up your database, then it won’t be long before you’re inundated with bad data once again—which you’ll have to clean up all over again.
Customization vs. complexity
Given the modern buyer’s expectation of customized, personal experiences, lead routing can become complex pretty quickly. For example, you may have both an SDR and enterprise sales rep who have financial services experience. So if a lead from a major financial institution converts on your website, you’ll want to make sure the lead is routed to the rep who meets both criteria on your lead qualification checklist.
Additionally, there may be times when your HubSpot routing rules conflict with each other. Let’s say you have an IT-savvy SDR, but your enterprise reps aren’t tech-literate. If you have a VP of IT at a large company come in, do you send them to the SDR or the enterprise rep?
Both of these examples illustrate that as your sales workflows become more customized and complex, they become more difficult to establish hard-and-fast rules. If you have to consider each use case individually, that defeats the whole purpose of routing in the first place.
Keep things simple at first. Only add more complex routing rules when you’re sure it will add value to your process, not make things more difficult. Tools like the best lead distribution software can help manage that added complexity without slowing you down.
Demographics-based vs. predictive routing
HubSpot’s lead scoring and qualification software works in two ways: demo-based and predictive. Demo-based scoring is where attributes that align with your ICP receive a certain number of points, aggregating to a HubSpot score for the contact. Predictive scoring uses a machine learning algorithm to analyze trends in your existing customer base, then determines which leads are most likely to close based on their alignment with those trends.
There are pros and cons to each approach, and you can use both in tandem. In lead routing, for example, you can use predictive scoring to initiate a routing workflow for leads that have a certain Likelihood to close (e.g. 70 or higher). Then, you can use rules-based scoring to determine where to route that lead.
Outliers
Not every lead that converts will buy (obviously!). But that doesn’t mean you should ignore all unqualified leads. It’s important to set up your lead routing systems in such a way that you can account for:
- Non-ICP potential customers (in other words, high-interest or good-fit customers you may not have previously consider)
- Non-customer allies (e.g. investors, industry partners)
- Non-customer end users for product and usage insights
Your lead routing system should be set up to handle these outliers. For example, if a lead is unqualified but demonstrates high levels of engagement across all your platforms, it may be worth it to flag that lead and potentially route it to an SDR for manual qualification.
How to set up lead routing in HubSpot: A step-by-step guide
Once you’ve mapped out your routing rules, cleaned up your data and governance practices, and come up with some negotiation policies for conflicting buyer signals, it’s time to build your lead routing workflows in HubSpot.
The Workflows tool in HubSpot is powerful, but it can be challenging for the uninitiated. But don’t worry. Bookmark this guide and refer back to it as often as you need.
1. Navigate to the Workflows tool
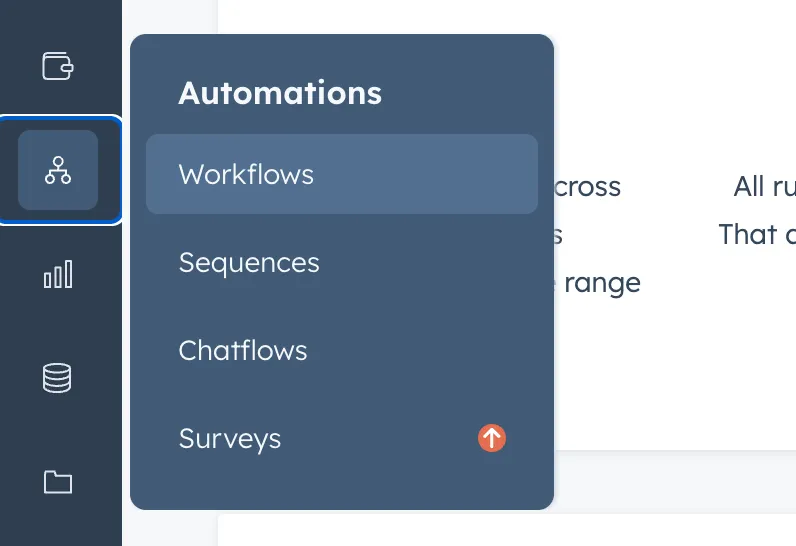
Hover over the Automations icon on the side menu, then select Workflows from the pop-up menu. (Note: this feature is only available for Marketing or Sales Hub Professional tiers).
2. Create a new Workflow
Once you’re in the Workflows tool, you should see a list of all Workflows associated with your account. You can always go in and edit Workflows at any time, but for now let’s select Create workflow.
Here you have two options: create the new workflow from scratch or from a template. Let’s dive into each process in detail.
Create a new Workflow from scratch
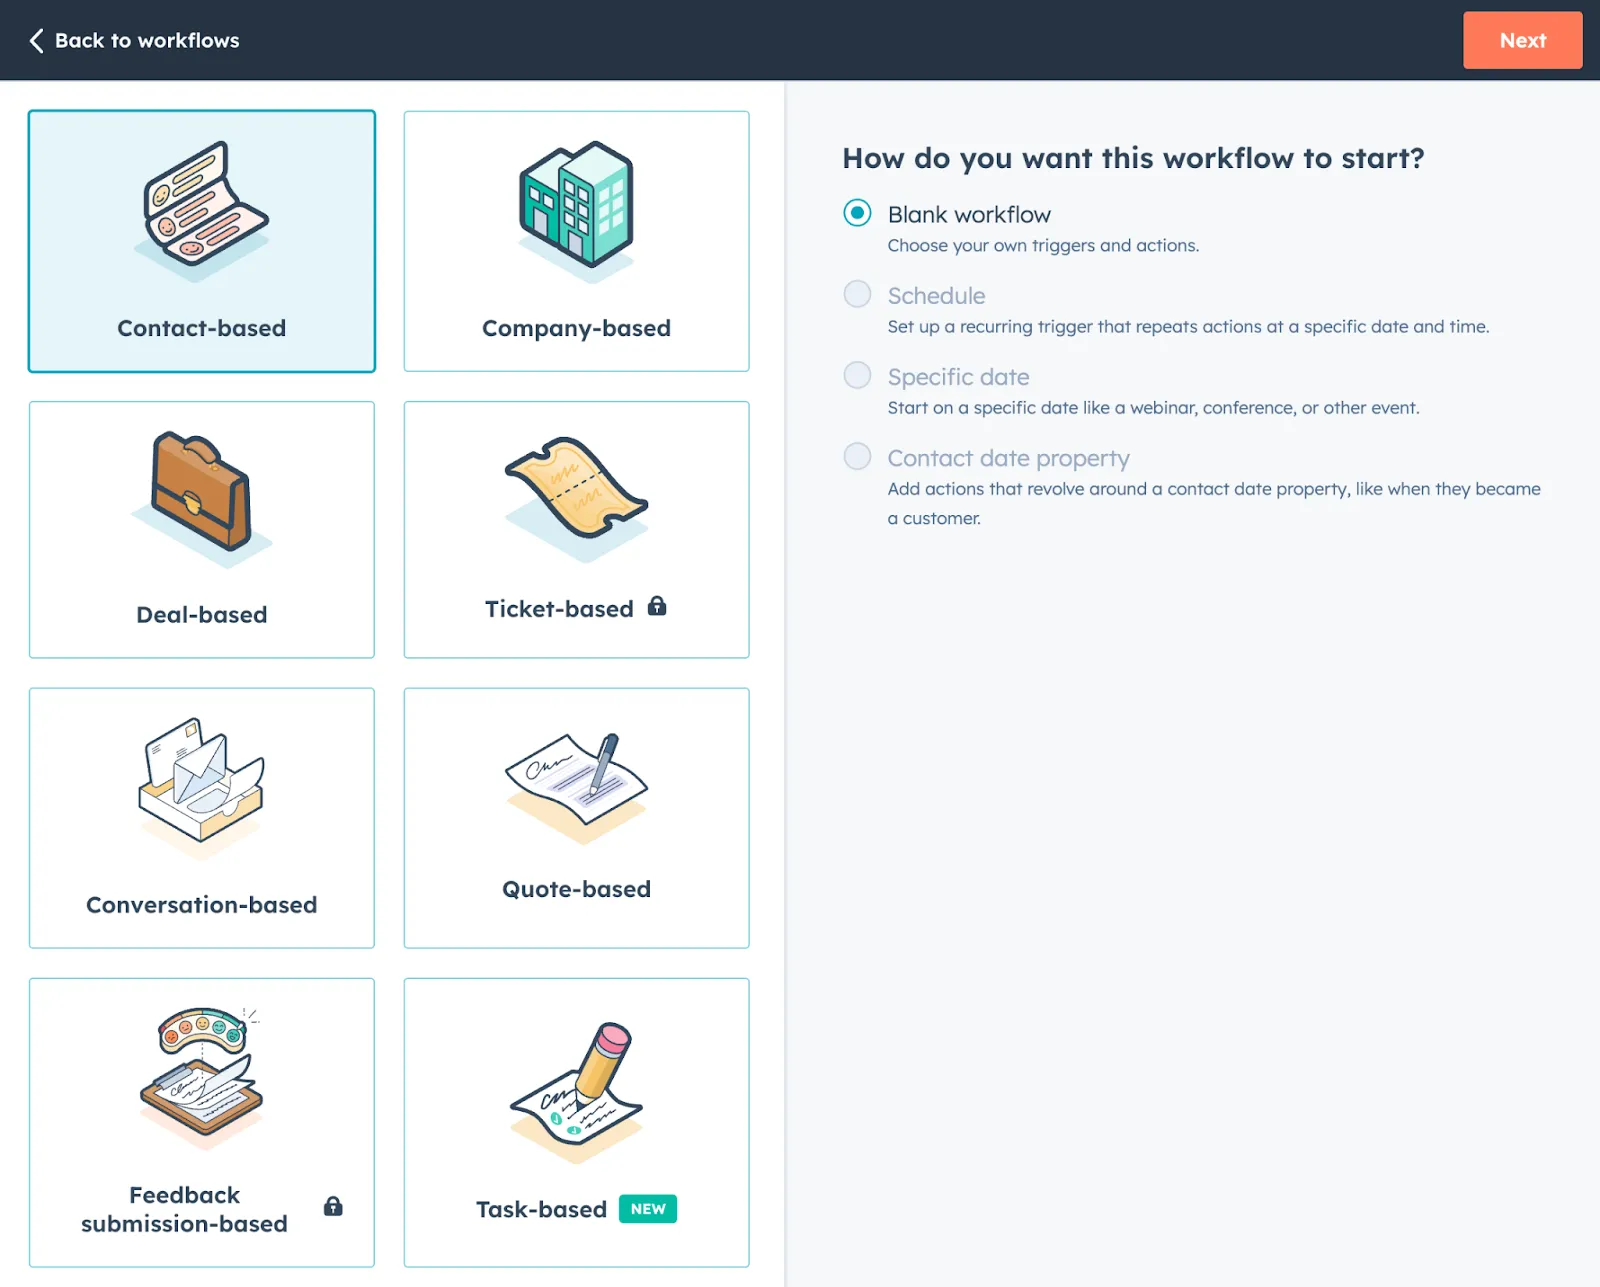
Once you select the From scratch option, you’ll be directed to the Workflow builder. From here, you can select which objects you want to be enrolled in the workflow. Since this is a lead routing workflow, let’s select Contacts.
Next, navigate to the right panel and under Choose type, select Blank workflow (Note: If you don’t select it, no sweat—this is the default option). Then, at the top left, select Next.
If you want to tailor your new Workflow to a more specific use case, you can also choose from the following types:
- Specific date. Create a workflow that’s centered around a specific date, like a webinar, conference, product launch, etc.
- Schedule. Much like the Specific date type, this Workflow repeats actions at a specific date and time.
- Contact date property. This Workflow centers around a specific date relative to your customer’s buying journey (e.g. conversion date, become a customer date)
After you create your workflow, you can select the pencil icon to name your workflow.
Create a new Workflow from a template
HubSpot also offers a variety of Workflow templates based on best practices and successes among its user base. While every user is different and these templates likely will require some customization, they can often be a good place to start—especially if you’re new to building lead routing workflows.
When you go to Create workflow, select From template. From there, you’ll be directed to the templates library, where you can select the one that best fits your needs.
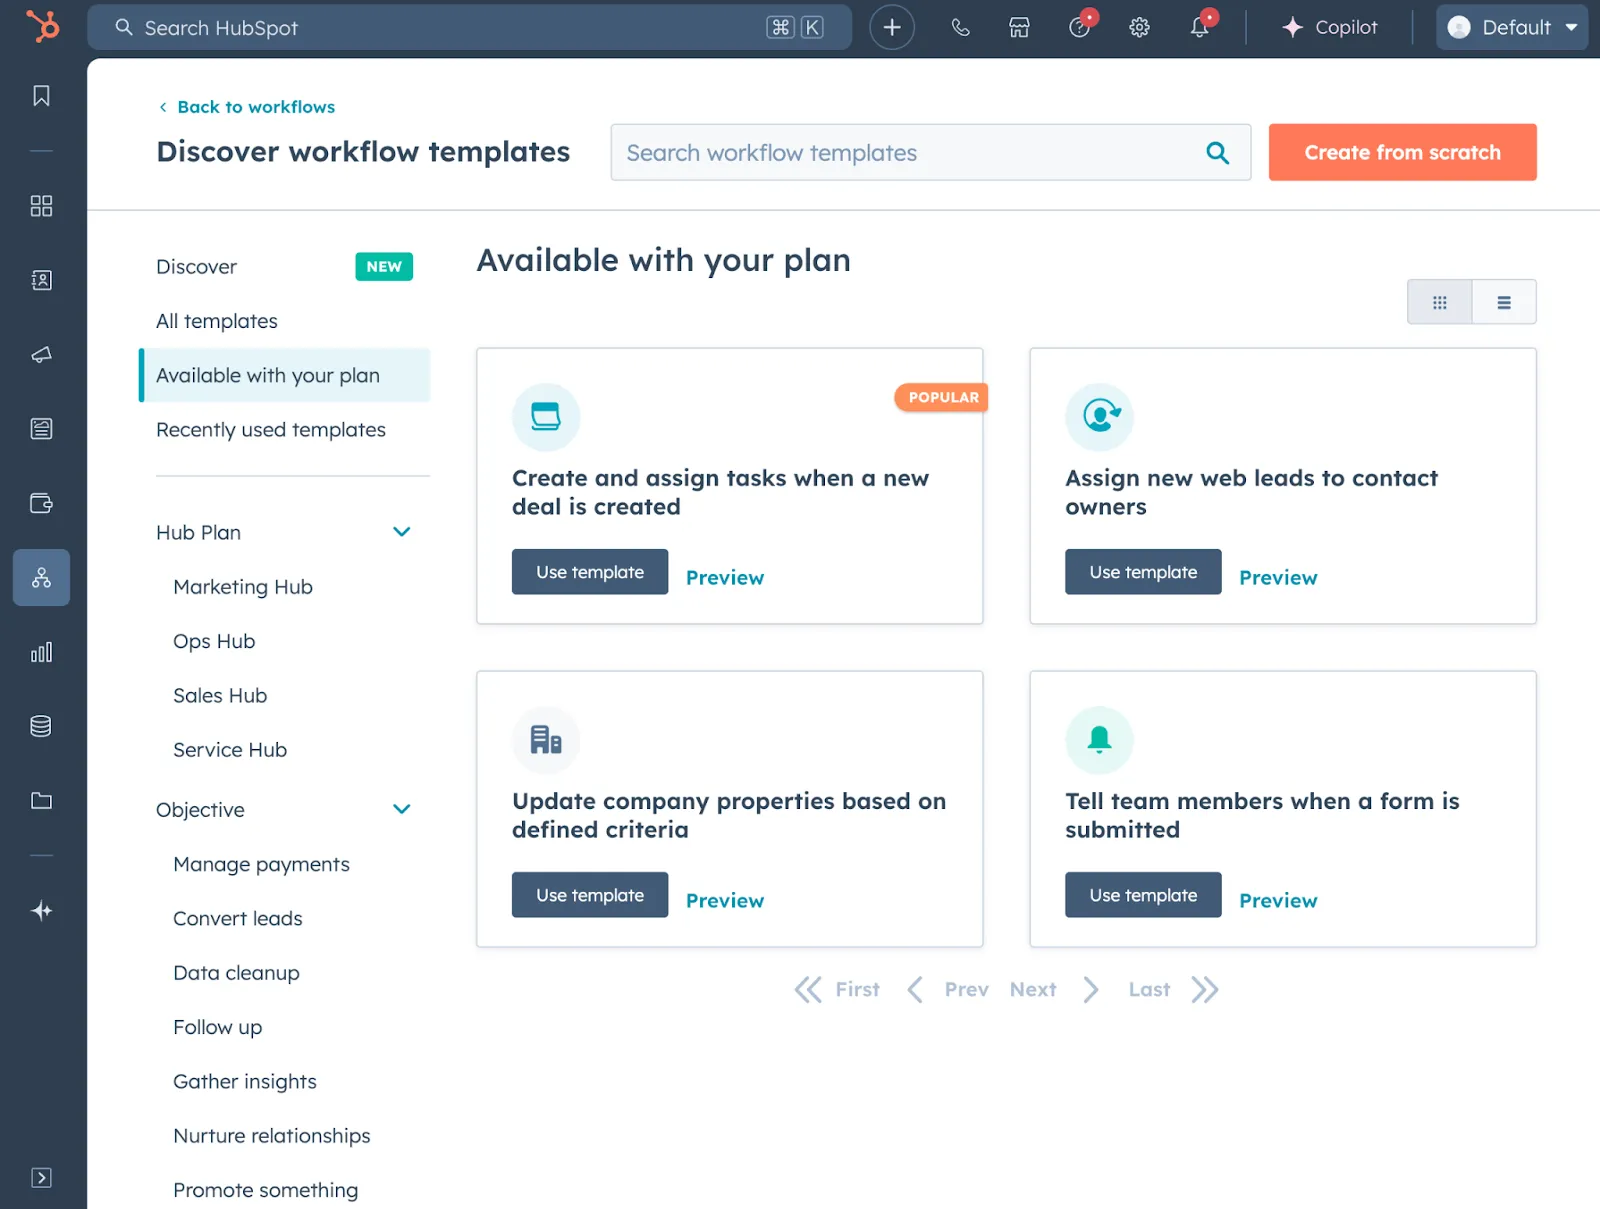
Naturally, not all templates in your lead library will be relevant to lead routing. So you’ll want to filter the available options to only those ones you need. You can do this in two ways:
- Filter templates by those included in your plan, or by a specific objective (e.g. routing or distributing leads)
- Use the search bar in the upper right-hand corner to filter based on keywords (e.g. lead routing, lead distribution, lead assignment). For the best results, you should keep these searches as broad as possible.
Once you find a template you’re interested in, select Preview. This enables you to check the following template details:
- Compatibility: Is the template available with your current HubSpot subscription tier?
- Purpose: What goal or outcome does the template help you achieve?
- What you’ll need to prepare: What assets do you need to create to populate this workflow (e.g. marketing emails, landing pages, forms)?
- Template preview: See the enrollment triggers, workflow actions, delays, and placeholder assets included in this template.
After reviewing your template options and choosing the one that best fits your needs, select Use template. You can then customize and modify your new workflow as much or as little as you need.
3. Set up enrollment triggers
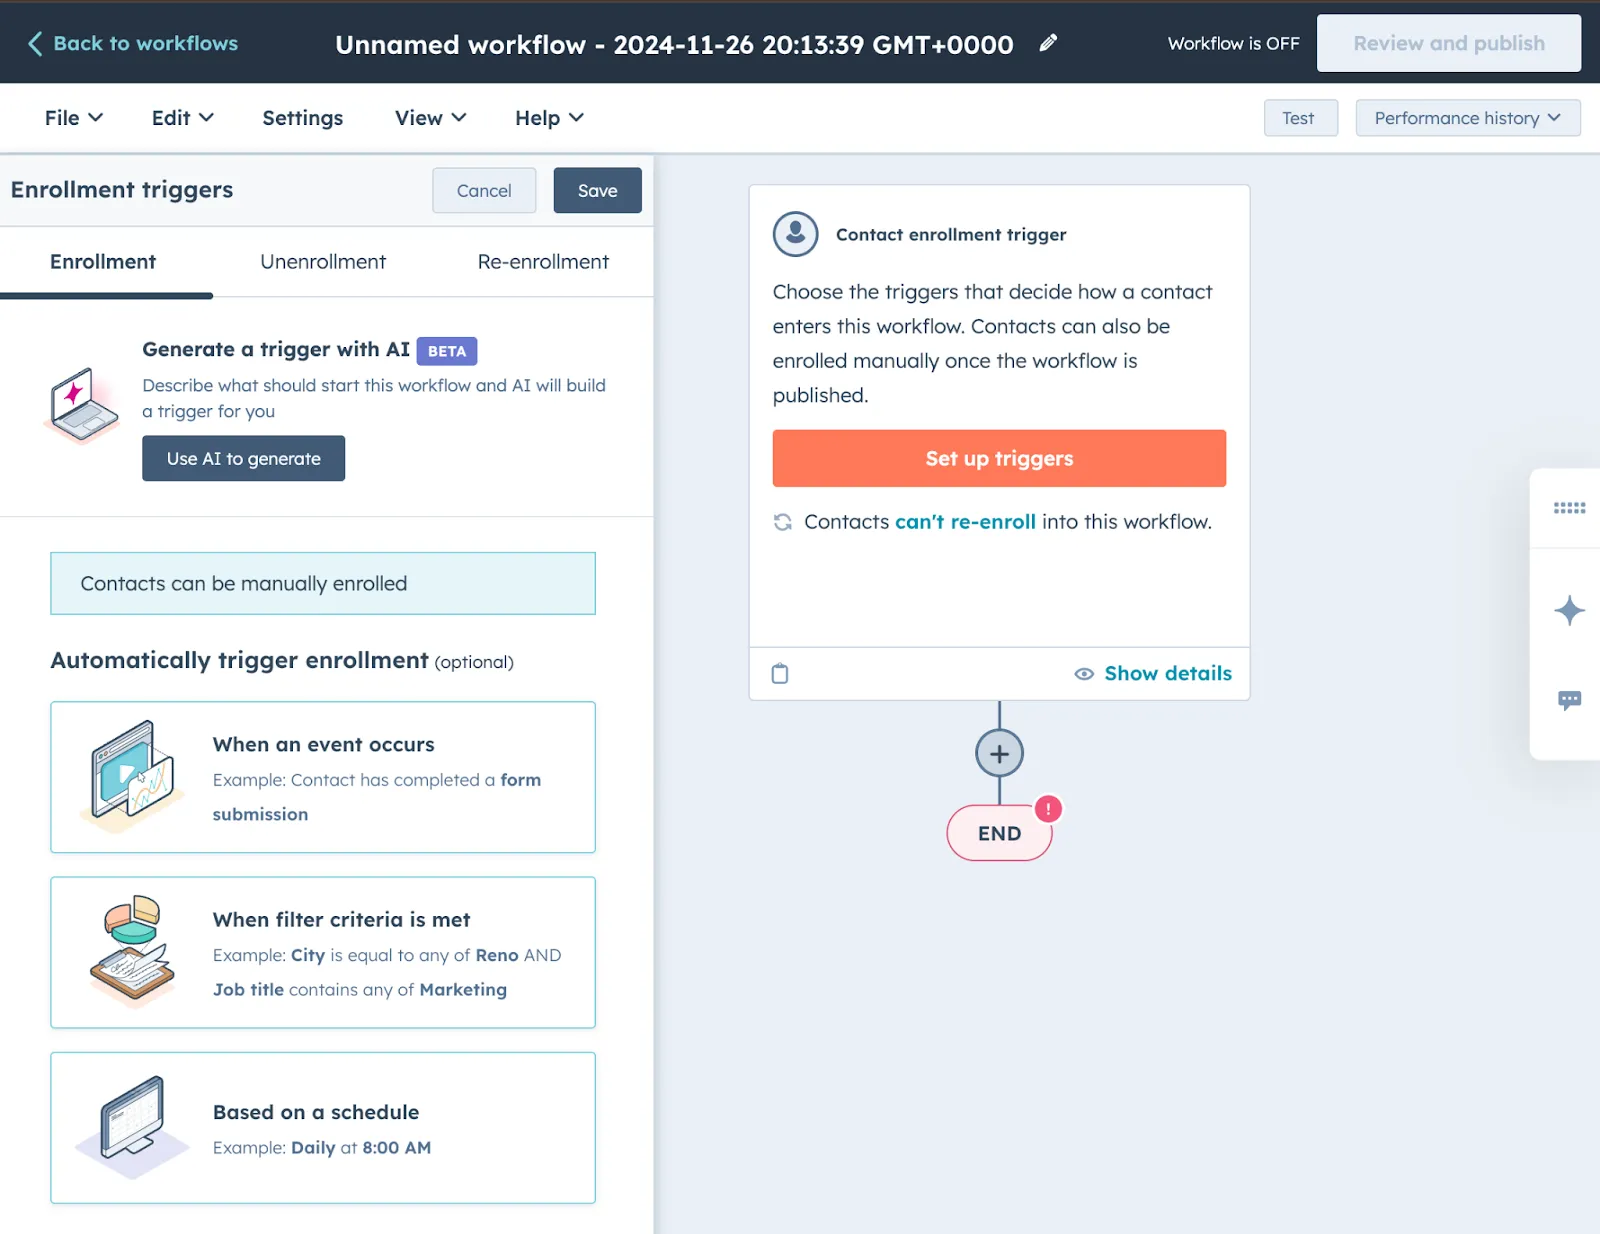
Once you’ve built out your workflow template in HubSpot, the next step is to set up your enrollment triggers. These criteria will determine which contacts enter the workflow and when. HubSpot offers three options for setting up enrollment triggers:
- Manual triggers are set up in advance based on specific criteria you want met before a contact enters a workflow (for lead routing, this is typically a certain HubSpot score or change in qualification status)
- AI triggers are automatically built based on form submissions, property changes, changes in list membership, page views, and more
- No triggers means that you have to add each contact to the workflow manually (this approach typically only works when you have fewer than 10 inbound leads per month)
To set up manual triggers, select Set up triggers in the left panel. You’ll see three options:
- When an event occurs
- When a filter criteria is met
- Based on a schedule
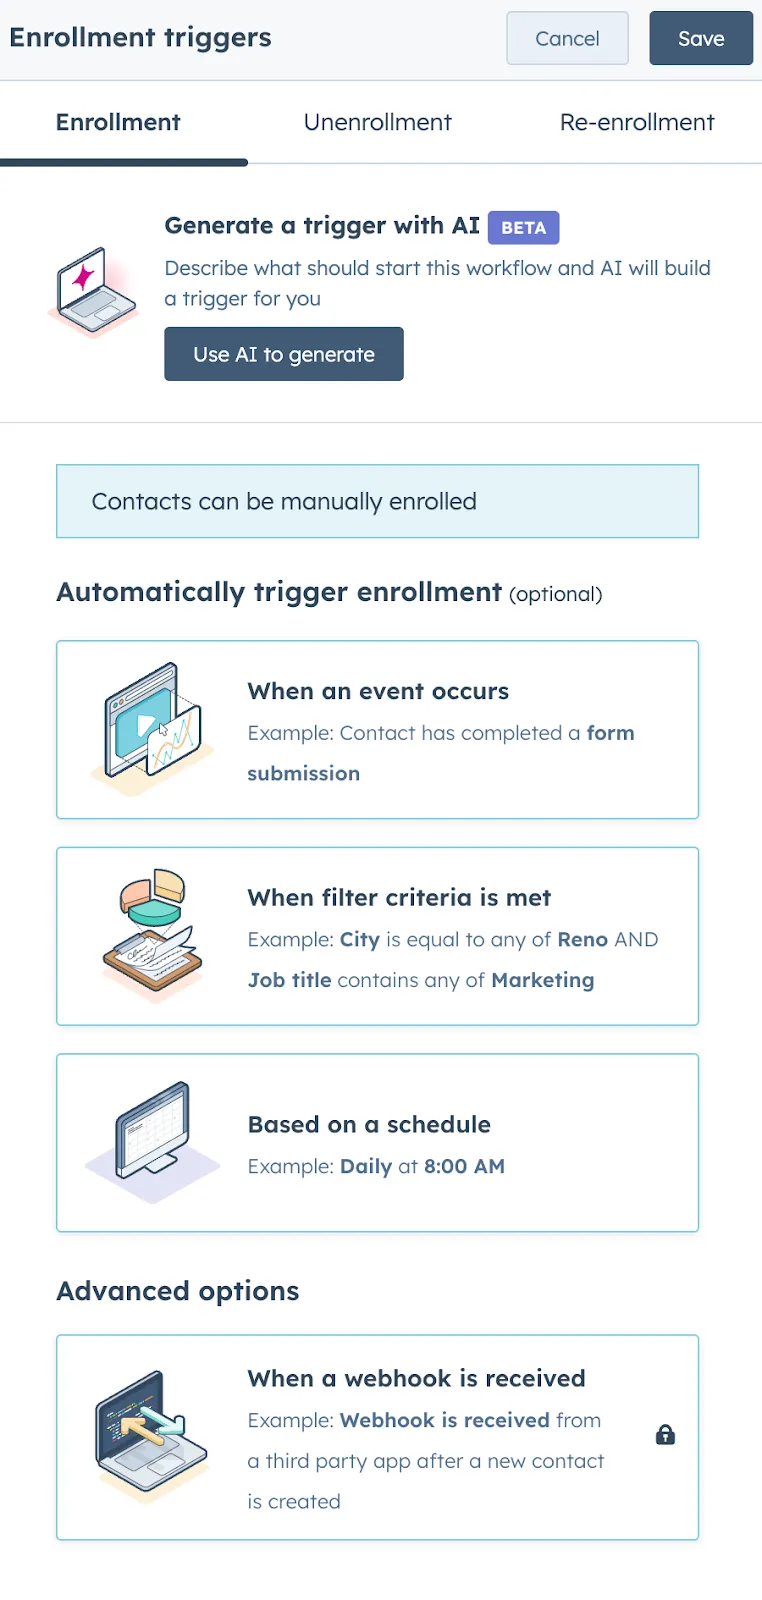
Alternatively, you can use HubSpot’s Breeze AI to set up a trigger:
- Select Set up triggers in the workflow editor
- Select the Enrollment trigger box
- Select Use AI to generate
- In the input box, describe the filter you want to create. You can add multiple criteria at once.
- Once you’re satisfied with the description, select Generate trigger.
- At that point, you’ll see the suggested trigger appear in the form editor. If you want to use that trigger, select Keep trigger.
- If you don’t like the trigger Breeze AI created, click Back to refine or generate a different trigger.
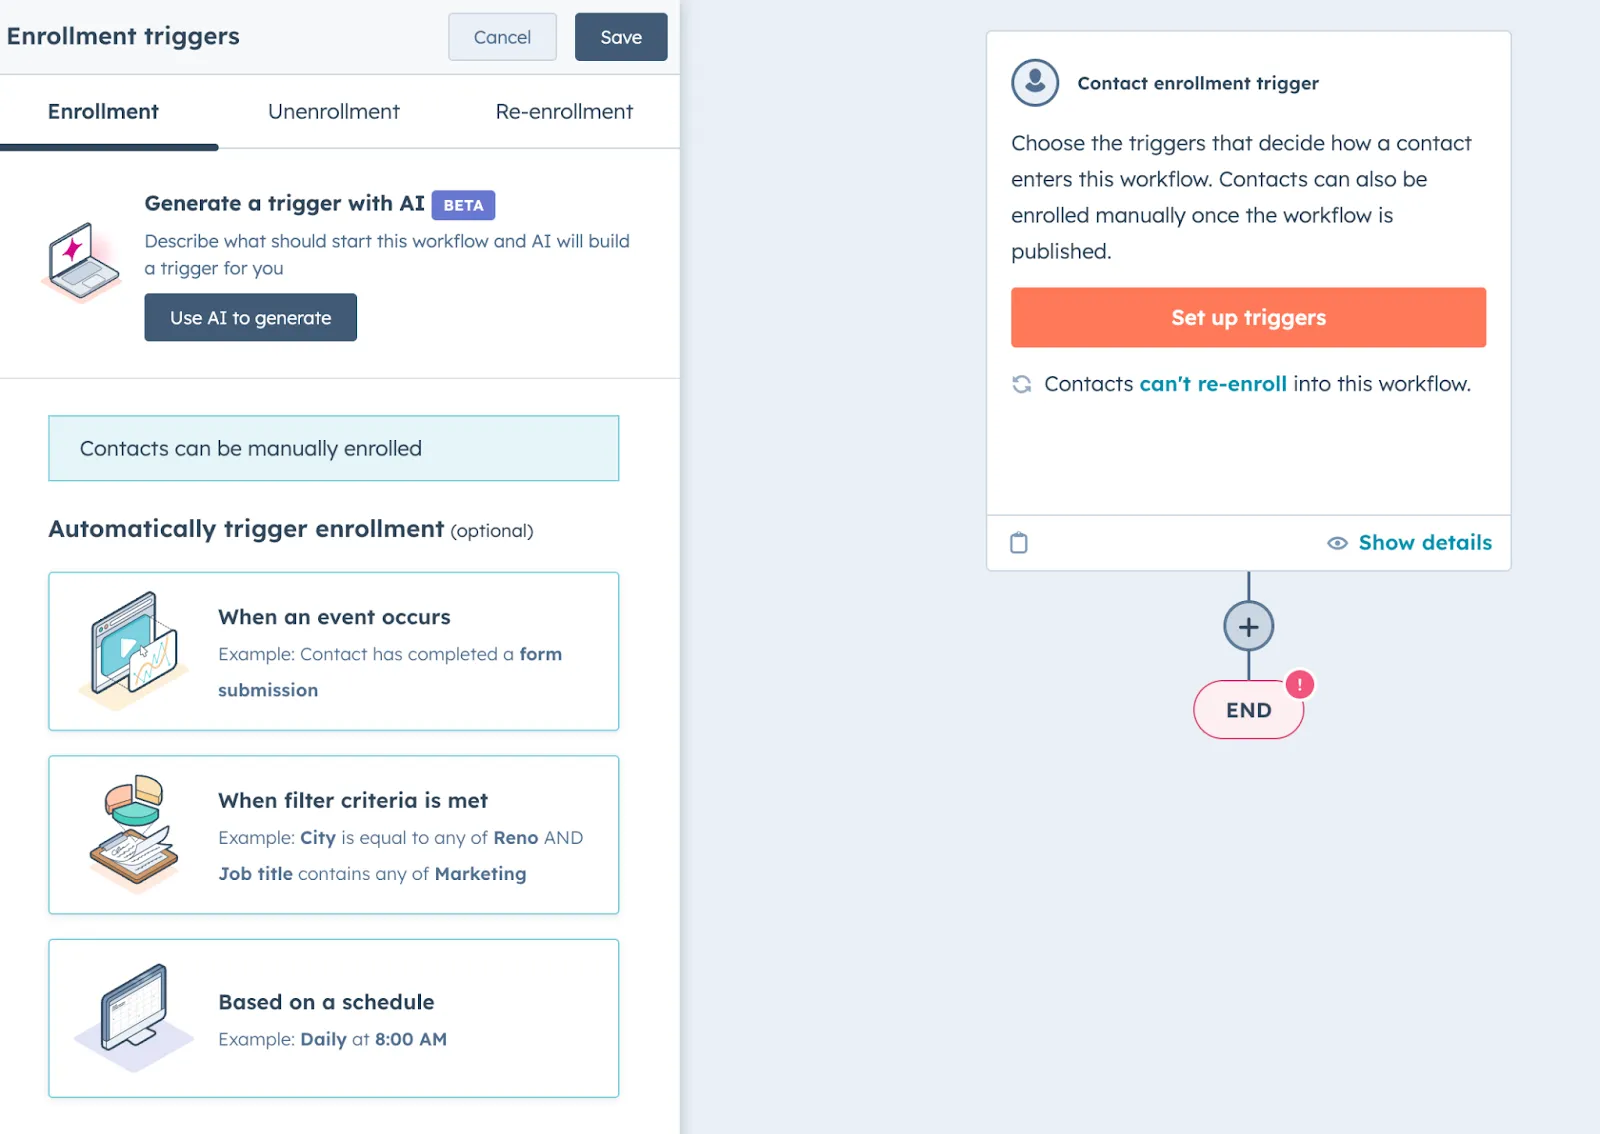
You can add as many enrollment triggers as you need. Keep in mind that HubSpot’s default setting is to only enroll a contact in a workflow the first time the contact meets the enrollment triggers. If you want to enable re-enrollment:
- Select the Re-enrollment tab in the left panel
- Toggle the Re-enrollment switch on
- Select triggers to use for re-enrollment. Here you can follow the same process as you did when creating initial enrollment triggers.
- When you’re done, select Save.
4. Add lead routing actions to your workflow
If you’re building a lead routing workflow in HubSpot from scratch, you’ll need to add actions manually. If you’re using a template, you’ll use these same features to edit or augment the actions that are currently in the flow.
As with the enrollment triggers, you can either use Breeze or build out your routing rules manually. For example, you can insert the following prompts into Breeze:
- Assign the lead using round robin rules to a sales rep
- Assign the lead using round robin rules to [Sales Rep #1], [Sales Rep #2], or [Sales Rep #3]
- If the lead is unqualified, assign it to an SDR. If the lead is qualified, assign it to an AE
And so forth. You’ll always want to verify that the routing rules HubSpot generates actually fulfill the prompt. If Breeze gets 90% there, you can always go in and edit them. If it’s way off, you should go back and rewrite your prompt.
Whether you’re editing a template, AI-generated rules, or building from scratch, here’s how to manually add actions to a HubSpot workflow:
- In the workflow editor, select the + icon
- Once the left panel opens, select a workflow action (see our list of available workflow actions below)
- After setting up the action details, select Save.
The list of available actions in a HubSpot workflow include:
- Delay. This action uses a set time frame, calendar date, or other time-based metric to postpone subsequent actions until a future time.
- Branch. This action creates a simple yes-no branch based on a property value, if-then criteria, or even random percentage (the latter being helpful for weighted round robin rules).
- Go to workflow. Enroll the contact into another workflow.
- Go to action. Use this function to consolidate if-then branches.
- Communications. Send an automated email, in-app notification, or WhatsApp message to the contact, or enroll them in an existing Sequence.
- CRM. Edit or create records, tasks, or otherwise update properties within the HubSpot CRM. This is where you can use the Rotate record to owner feature to newly enrolled contacts to users equally within a selected team or between specified users (i.e. customized round robin).
You can easily undo or redo changes by using the arrows in the top lefthand corner of the Workflow editor. You can undo or redo changes one at a time.
5. Review your workflow
After adding all the necessary rules to your HubSpot workflow, you then have the option to review its minimap. This offers you a visual representation of your workflow’s logic and architecture:
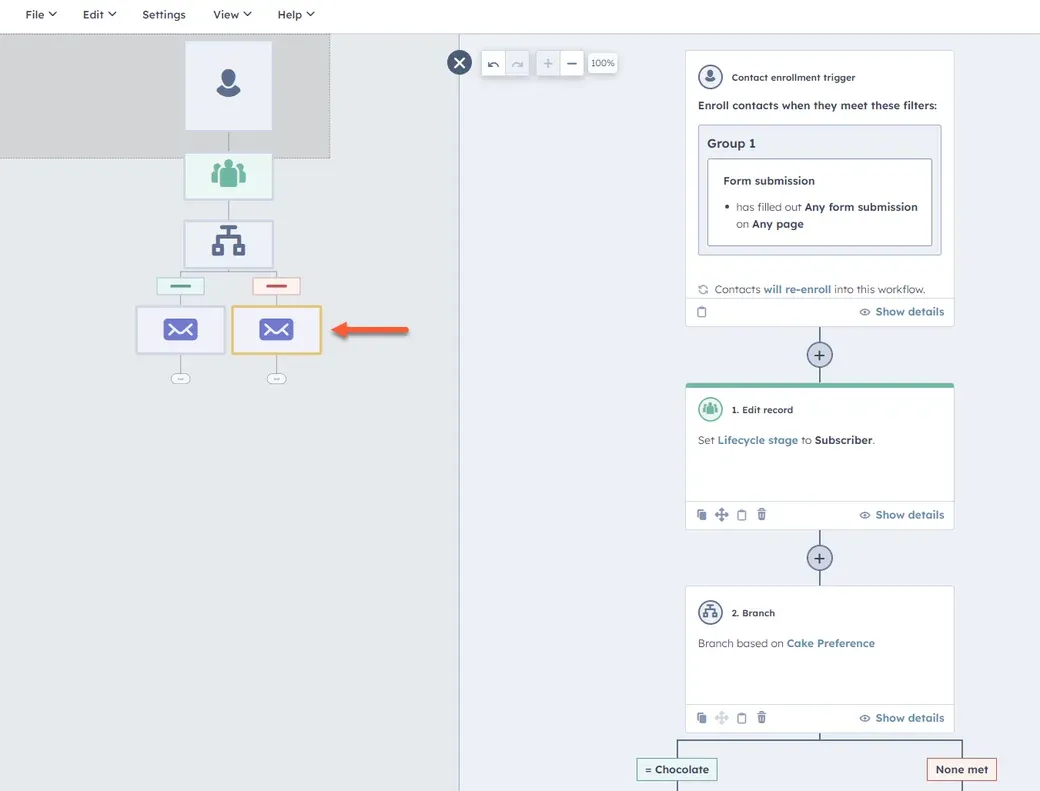
You can do that by selecting the Show minimap panel in the upper lefthand corner of the workflow editor.
Once you’ve opened the minimap, hover over workflow actions to view the action name. If you click on any area of the minimap, you’ll automatically be navigated to that area of the workflow.
6. Specify workflow settings
By selecting Settings in the top lefthand corner of the workflow editor, you can fine-tune your workflow specifications even further. Here are some of the settings that are available for you.
Timing
Specify when records can execute workflow actions based on specific dates or times within the contact’s timezone (e.g. between 10 and 5 MWF). If a contact is enrolled in the workflow outside of those designated hours, the next action will be rescheduled for the next available time.
You can also designate specific dates you don’t want a workflow to run (e.g. holidays, major industry events).
User notifications
You can set individual notifications when a contact is enrolled in the workflow. For example, HubSpot can automatically inform the account owner (if assigned) or designated sales leader (if unassigned) in real time.
Unenrollment
HubSpot also enables you to un-enroll users from all other workflows when they enter your lead routing flow.
This feature has pros and cons. On the one hand, you may want to prevent a newly qualified lead from seeing irrelevant lead gen material if they’re talking to a sales rep. On the other hand, relevant marketing communication can help to move the sales process along. So you’ll have to decide which approach works best for your sales and marketing strategy.
Suppression list
You can also add a suppression list to prevent contacts from enrolling in the workflow. This can be particularly helpful if you have hard bounces, competitor lists, or unqualified leads that are so far afield from your ICP that it makes no sense to include them.
7. Turn on your workflow
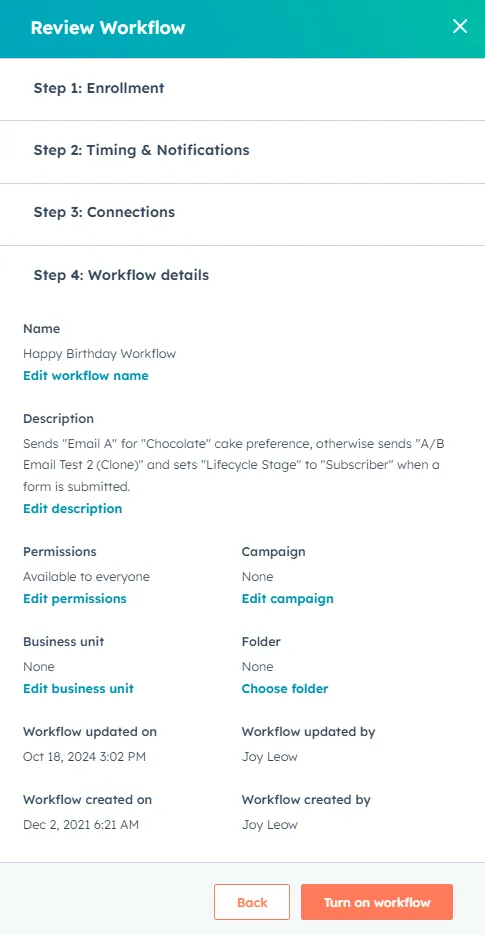
Once you finish fine-tuning your workflow, go to the upper right-hand corner of the workflow editor and select Review and publish. From there you can review all your final details, then select Next, and finally Turn on workflow.
Best practices for lead routing in HubSpot
Now that we’ve walked through many of the technical details, let’s look at some important best practices for routing leads with HubSpot’s lead distribution software.
Enrich leads before routing them
This may seem like a no-brainer, but you’d be surprised how many organizations route leads without the data necessary to properly qualify and distribute them. If you use a third-party enrichment tool, make sure to delay the routing process in HubSpot to allow your enrichment tool to pull in the necessary data before routing them.
Set up re-routing rules
Not only do fast lead response times result in more qualified meetings, but they also improve the prospect’s experience. So if a rep doesn’t respond to a lead quickly enough, you need to have re-routing rules in place. (Note: you’ll need to make it clear to reps that if they don’t respond and log the activity in HubSpot within the designated time frame, their lead will be reassigned.)
Start simple, then expand
Lead routing is a complex process, and odds are you aren’t going to get it right on the first go. Before building a bunch of complicated rules and introducing the potential for mass chaos into your sales organization, your best bet is to start with a simple, straightforward approach (like basic round-robin). Then, once you and your reps become familiar with that approach, you can add nuance and complexity into the system.
HubSpot lead routing drawbacks
Despite including a number of impressive features and automation capabilities, there are some drawbacks to HubSpot workflows, especially when used in lead routing. Here are some of the more common challenges users face.
Complex setup
Probably the most difficult issue with HubSpot lead routing is a complex setup process. While, yes, there are some templates that can give you a head start, you essentially have to build your lead routing logic from scratch. Although HubSpot’s interface is drag-and-drop, using some of the more complex automation capabilities requires a deep knowledge of the platform and all its nuances.
Rigid routing rules
Although HubSpot does enable some flexibility when it comes to setting up your routing rules, you’re essentially limited to the fields and data that exist within HubSpot. If you want to use data from your product, enrichment, or other sources, you essentially have to create an API that ports that data into a custom field, then use that in the workflow. This can be a labor- and cost-intensive process, and requires developer resources that not every organization has on deck.
Limited workload balancing
In its current iteration, HubSpot doesn’t offer the ability to balance lead assignment with rep availability or capacity. This means that some reps may end up with more leads than they can handle, while others end up falling short.
No weighted distribution
In the same vein, there’s no way to weight lead distribution in HubSpot. For example, you may want to limit the number of inbound leads new reps receive while they’re on their on-ramp. Or, you may have a rep on a PIP and want them to have a lighter workload. In either case, you would weight that rep at 0.5 vs. the 1.0 that the typical rep receives. As of now, HubSpot doesn’t offer this capability.
Lead-to-account matching challenges
HubSpot often struggles with lead-to-account matching. Different email addresses, company URLs, and incomplete information can result in duplicate records, which in turn circumvent any attempts you make in the workflow to suppress re-enrollment from existing customers.
HubSpot lead routing FAQs
Does HubSpot offer lead routing?
Yes, you can use the HubSpot Workflow tool for lead routing purposes. The Workflow can be triggered by a variety of actions—engagement, change in lead score, conversion, etc.
How do you handle leads in HubSpot?
To handle leads in HubSpot, you can either set up automated lead routing rules through the Workflows tool, or periodically filter Contacts to manually qualify and route leads. The latter manual approach is time consuming and may not be the best use of your resources.
How does HubSpot assign leads?
HubSpot can assign leads through round robin or rules-based Workflows. The platform enables a variety of customizations that enable you to further customize your round robin rules (e.g. distribute leads only among certain sales teams).
How to automate your lead routing with Default
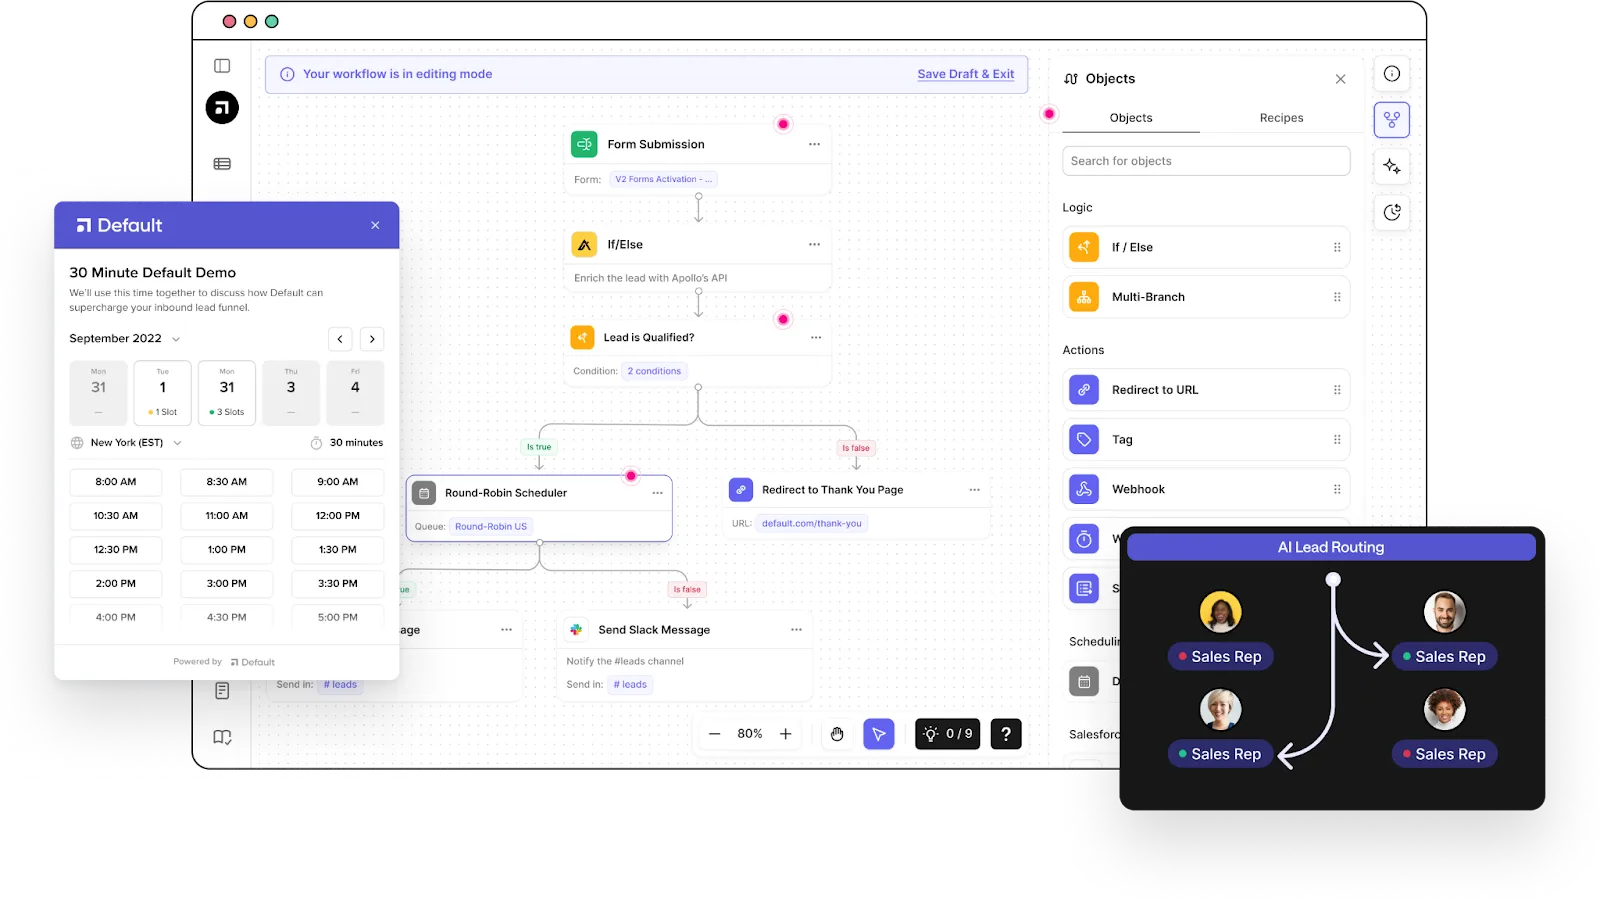
HubSpot’s lead routing capabilities are relatively easy to set up, but limited in how far you can customize them. The biggest challenge is combining a round robin routing approach with other routing rules to help balance fairness with sales efficacy.
Default has a fully customizable, drag-and-drop interface that tailors your workflows to any lead distribution model. No matter how your sales team is set up, we can handle it.
What’s more, our batteries-included enrichment and orchestration capabilities remove friction from the follow-up process. Automated Slack notifications, calendaring, and integrations with your entire RevOps tech stack keep your inbound engine running smoothly and seamlessly.
→ Embed Product Page CTA 🚨
Conclusion

Former pro Olympic athlete turned growth marketer. Previously worked at Chili Piper and co-founded my own company before joining Default two years ago.
Run revenue as an engineered system
Revamp inbound with easier routing, actionable intent, and faster scheduling




.png)


